The perfect approach shoe doesn’t exist; the optimal one is a calculated system of compromises between climbing grip and hiking durability.
- Sticky rubber compounds that excel on rock inherently wear faster; durability is a direct trade-off for friction.
- A precise, “climbing-fit” toe box enhances edging performance but can compromise all-day hiking comfort.
Recommendation: Select a shoe not for its features, but for its design philosophy—choosing the set of trade-offs that best aligns with the specific terrain and duration of your typical adventures.
For the hiker who scrambles, the choice of footwear is a constant negotiation. A hiking boot feels clumsy on technical rock, while a climbing shoe is punishing on a long trail. The approach shoe presents itself as the solution, a hybrid promising the best of both worlds. Yet, this promise often leads to confusion. Many guides focus on simple feature lists, advising you to look for “sticky rubber” or a “good fit,” but this overlooks the fundamental engineering principles at play. The reality is that every approach shoe is a series of intentional design trade-offs.
From a footwear design perspective, an approach shoe isn’t one thing—it’s a balance point on a spectrum. The stickiest rubber compound has a lower durometer, meaning it’s softer and wears faster. A waterproof Gore-Tex liner that keeps morning dew out may trap sweat on a hot afternoon, increasing the risk of blisters. True selection isn’t about finding a shoe with every feature; it’s about understanding the inherent compromises between friction and longevity, precision and comfort, protection and breathability. This is the difference between a trail runner, which prioritizes cushion and mileage, and a true approach shoe, which prioritizes the integrity of its edging platform.
This guide deconstructs the structural and material science behind approach shoe design. We will analyze the core engineering dilemmas—sole compound versus wear, toe box volume versus edging precision, and lacing mechanics versus heel security. By understanding these calculated compromises, you can move beyond marketing claims and select a shoe based on its underlying design philosophy, ensuring it performs exactly where and when you need it to.
This article breaks down the critical engineering decisions and user techniques that define the modern approach shoe. Explore the detailed table of contents below to navigate the key trade-offs and considerations.
Summary: A Structural Analysis of Approach Shoe Performance
- Sticky Rubber vs Durability: Which Sole Lasts Longer on Granite?
- Toe Space vs Precision: How Tight Should an Approach Shoe Be?
- Gore-Tex liners: Do They Cause Blisters by Trapping Sweat?
- Heel Lock: How to Lace Shoes to Prevent Toe Bang on Descents?
- Throw Away or Fix: Can You Replace the Sole on Approach Shoes?
- Chalk Marks vs Natural Holds: How to Find the Route When It’s Not Color-Coded?
- Approach Shoes or Hiking Boots: What Grips Best on Slippery Algae?
- Preparing for Active Travel: How to Train for a Hiking Trip 3 Months in Advance?
Sticky Rubber vs Durability: Which Sole Lasts Longer on Granite?
The sole of an approach shoe is its primary interface with the world, and its design is governed by one core trade-off: friction versus durability. The “stickiness” of an outsole is determined by the durometer (hardness) of its rubber compound. Softer rubber, like that found on high-performance climbing shoes, deforms at a micro-level to maximize surface area contact with the rock, providing exceptional grip. However, this same softness makes it highly susceptible to abrasion, especially on coarse surfaces like granite. A harder rubber compound offers significantly better wear resistance but sacrifices that crucial, confidence-inspiring friction on technical terrain.
From a design standpoint, this isn’t a flaw; it’s a deliberate choice. A shoe intended for long, rugged approaches with short scrambling sections will utilize a harder, more durable rubber. Conversely, a shoe built for climbers who spend more time on vertical rock will use a softer compound, accepting that the sole will wear out faster. Comprehensive field tests involving over 460 trail miles and nearly 100 guidebook pitches demonstrate how varied terrain rapidly exposes these design choices. A shoe that excels in one area often shows its limitations in another.
Case Study: La Sportiva TX Guide Durability Analysis
Field testing of the La Sportiva TX Guide highlighted this exact trade-off. Testers noted the shoe’s exceptional climbing performance on technical rock, attributing it to the very sticky rubber compound. However, according to an analysis by OutdoorGearLab, this performance came at a cost: the shoes began to delaminate (where layers of the shoe separate) relatively early in the testing period. This demonstrates that prioritizing maximum grip can sometimes compromise the shoe’s long-term structural integrity, forcing the user to choose between peak performance and extended lifespan.
Therefore, the question is not “which sole lasts longer,” but “which balance of grip and durability aligns with my primary use?” Understanding the material science behind the sole allows you to select a shoe based on an informed prediction of its performance and lifespan, rather than on a simple marketing claim of “stickiness.”
Toe Space vs Precision: How Tight Should an Approach Shoe Be?
The internal geometry of an approach shoe, specifically the volume of the toe box, dictates its position on the spectrum between hiking comfort and climbing precision. A tight, low-volume toe box, similar to a climbing shoe, minimizes any internal foot movement. This provides a direct transfer of power to the shoe’s edge, allowing for precise foot placements on small holds. This is what we call a strong edging platform. However, this precision comes at the expense of comfort. On long descents or during a full day of hiking, a restrictive toe box can lead to pressure points and discomfort as the foot naturally swells.
Conversely, a roomier toe box, akin to a hiking shoe, allows for natural toe splay and accommodates foot swelling over long distances, greatly enhancing all-day comfort. The compromise here is a loss of precision. The slight movement of the foot inside the shoe means less direct power transfer to the edge, making delicate footwork feel less secure. The designer’s task is to find the optimal “last”—the three-dimensional model around which the shoe is built—that provides enough security for climbing without creating a punishing fit for hiking.
As the illustration demonstrates, an optimal fit secures the heel firmly in the heel cup while allowing just enough space for the toes to lie flat without being crammed. The final fit is a personal equation, but understanding the design intent behind different toe box shapes is critical. A shoe designed for scrambling in the Flatirons will have a different fit philosophy than one designed for backpacking in the Sierra Nevada.
Your 5-Point Fitting Protocol
- Time it Right: Try on shoes in the afternoon or evening. Your feet swell slightly during the day, mimicking their state during a long hike.
- Wear Your Socks: Use the exact socks you plan to hike and climb in. Sock thickness dramatically affects the shoe’s internal volume and overall fit.
- Test the Lacing: Fully lace the shoes up. A good lacing system should allow you to customize the fit, tightening it for technical sections and loosening it for the trail.
- Check for Movement: Ensure your heel is locked in and does not lift when you walk. Your toes should have space to wiggle, but the forefoot should not slide side-to-side.
- Simulate the Terrain: Walk up and down an incline ramp if available. This is the best way to check for heel lift on ascents and toe bang on descents.
Gore-Tex liners: Do They Cause Blisters by Trapping Sweat?
The decision to opt for a waterproof-breathable membrane like Gore-Tex is another classic engineering compromise, this time between environmental protection and internal moisture management. The membrane’s primary function is to block external water molecules (rain, puddles) from entering the shoe while allowing smaller water vapor molecules (sweat) to escape. This is a shoe’s vapor transmission rate. When it works, it’s brilliant. As the experts at Runners Need note in their guide, this technology is a clear winner in certain conditions.
Gore-Tex and similar waterproof membranes are designed to keep water out, protecting your feet from rain, puddles, and wet grass. These shoes excel in cold, wet weather.
– Runners Need Expert Team, Guide to Running in Muddy Conditions
However, the “breathability” of any membrane has its limits. In high-output activities or warm, dry climates, you generate sweat faster than the membrane can transport it out. This trapped moisture saturates your socks and softens your skin, dramatically increasing the likelihood of friction and blisters. Furthermore, once a waterproof shoe is fully submerged—for instance, in a deep creek crossing—the membrane that was designed to keep water out now works to keep it in. A non-waterproof shoe, by contrast, will drain and begin to dry almost immediately.
This comparative table breaks down the performance scenarios, showing there’s no single “best” option—only the right choice for a specific environment.
| Scenario | Gore-Tex/Waterproof Performance | Non-Waterproof/Breathable Performance | Recommended Choice |
|---|---|---|---|
| Constant Dampness (e.g., Scottish Highlands) | Excellent: Keeps feet dry from external moisture | Poor: Feet stay wet all day | Waterproof membrane |
| Sudden Soaking (river crossing) | Poor once water enters: Struggles to escape, feet waterlogged | Good: Drains and dries in couple hours | Breathable non-waterproof |
| High-Output/Hot Conditions | Poor: Reduced breathability, sweat accumulation | Excellent: Maximum ventilation, sweat wicking | Breathable non-waterproof |
| Cold + Wet Weather | Excellent: Keeps feet warm and dry from rain/puddles | Poor: Cold wet feet from precipitation | Waterproof membrane |
Choosing a liner, therefore, requires an honest assessment of the conditions you most frequently encounter. A waterproof liner is an advantage for cold, wet climates but can become a liability in hot, dry conditions or on trips with unavoidable river crossings.
Heel Lock: How to Lace Shoes to Prevent Toe Bang on Descents?
A secure fit is not just about comfort; it is a critical safety and performance feature. On steep descents, an unsecured foot will slide forward inside the shoe, causing your toes to repeatedly slam into the front—a painful condition known as “toe bang.” The key to preventing this is achieving a solid heel lock, where your heel is firmly seated in the back of the shoe and cannot lift or slide. This is accomplished not by brute-force tightening, but through intelligent lacing architecture. High-performance approach shoes are designed with specific features to facilitate this.
As the product team at Arc’teryx points out, the design of the upper is central to achieving a customizable fit.
Extended lacing (which covers more of the upper) and integrated webbing are two features that allow you to tailor the fit of your shoe for added security and control.
– Arc’teryx Product Team, Understanding Approach Shoes: Features & Functionality
Extended, or “toe-to-toe,” lacing allows for micro-adjustments along the entire length of the foot. You can keep the forefoot relatively relaxed for hiking and then crank down the tension for better precision when climbing. More advanced designs incorporate zonal lacing, which effectively separates the upper into two distinct fit zones. This allows a hiker to maintain a comfortable “approach fit” and a secure “climb fit” within the same outing, without ever having to re-tie their shoes.
Case Study: AKU Rock DFS Dual-Zone Lacing
The effectiveness of such systems was demonstrated in a field test on New Hampshire’s notoriously rugged Huntington Ravine Trail. The tester used the AKU Rock DFS, which features a secondary quick-pull lacing system over the forefoot. For the long hike up, the shoes were laced for comfort. Before starting the 1,000-foot technical scramble, the tester engaged the secondary system, cinching the forefoot down for a much more precise and secure fit. This ability to instantly switch between fit modes proved essential for performance and safety, showcasing how modern lacing is a dynamic tool, not a static feature.
Ultimately, a good lacing system provides the mechanical advantage needed to secure your foot within the shoe’s chassis. By understanding and utilizing these systems, you can eliminate heel lift and prevent toe bang, transforming a shoe from a simple piece of footwear into a responsive and adaptable tool.
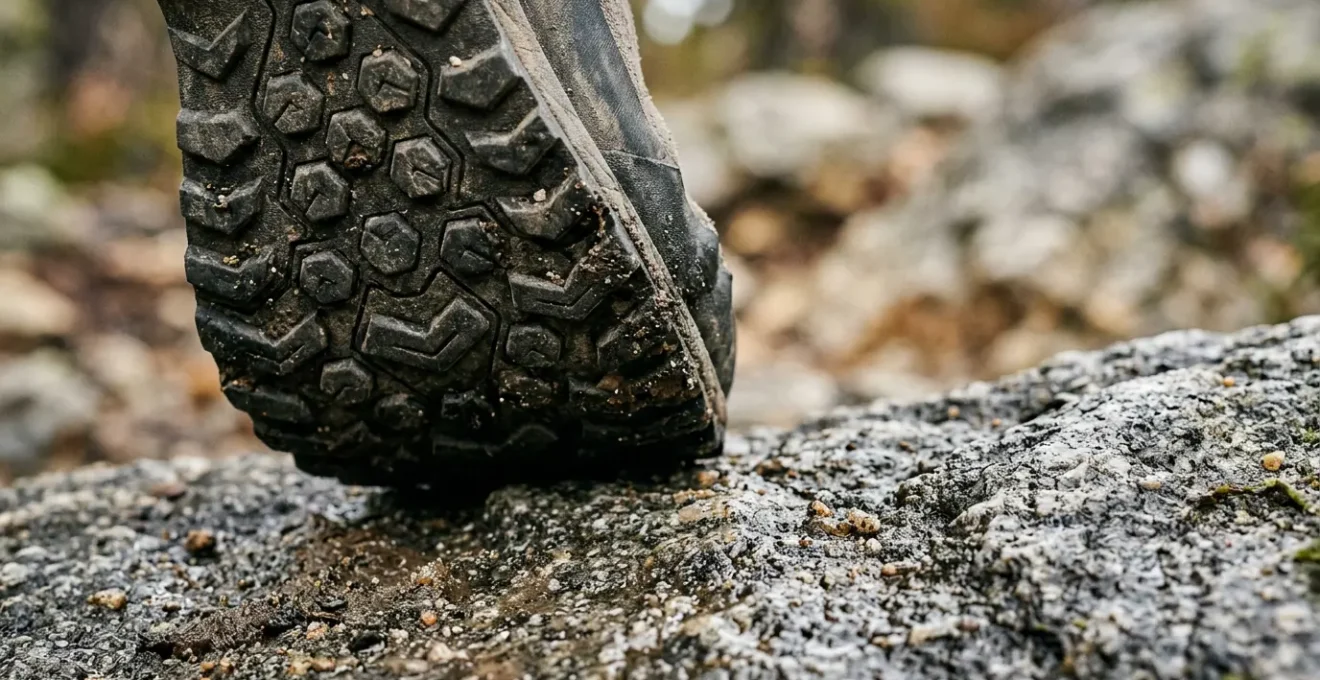
Throw Away or Fix: Can You Replace the Sole on Approach Shoes?
An approach shoe’s lifespan is finite, but its death is not always final. The question of whether to resole or replace a pair depends on understanding the difference between cosmetic wear and structural failure. The most common point of wear is the outsole—the sticky rubber will inevitably wear down, round off, and lose its effective edges. On a well-constructed, high-end shoe, this is often a replaceable component. Resoling can significantly extend the useful life of a shoe, making it a sustainable and cost-effective option, provided the rest of the shoe’s structure is sound.
However, the outsole is only part of the shoe’s chassis. Before considering a resole, a thorough inspection of the shoe’s upper, rand, and midsole is critical. The rand—the protective rubber band that wraps around the shoe—is the first line of defense for the upper. If it is peeling or worn through, the underlying leather or fabric is compromised. More importantly, the EVA or polyurethane (PU) midsole provides the shoe’s cushioning and support. Over time and with many miles, this foam compacts and “packs out,” losing its ability to absorb impact. A shoe with a dead midsole will feel flat and unsupportive, even if the rubber outsole is brand new.
As this image of a worn sole shows, the effective grip is concentrated in the edges and high-contact zones. Once these are rounded and polished, performance drops significantly, signaling that it’s time to assess the shoe for a resole. To determine if your shoe is a candidate, perform this simple inspection:
- The Uppers: Scrutinize the entire upper for any holes, significant abrasion, or failed stitching, especially around flex points.
- The Rand: Check the integrity of the rubber rand. If it’s peeling away from the upper or worn completely through in spots, a resole may not be worthwhile.
- The Midsole: Flex the shoe and squeeze the midsole. If it feels overly flexible, mushy, or “dead” compared to when it was new, its structural support is gone, and resoling will not restore its performance.
A successful resole requires a solid foundation. If the shoe’s upper and midsole are intact, replacing the worn-out rubber is an excellent way to breathe new life into a trusted pair of shoes. If the underlying structure has failed, it’s time for a new pair.
Chalk Marks vs Natural Holds: How to Find the Route When It’s Not Color-Coded?
Outside the controlled environment of a climbing gym, routes are not marked with brightly colored holds. Success on an outdoor scramble or climb relies on your ability to read the rock and identify natural features. While excessive chalk can obscure the way, subtle traces of passage offer clues to those who know what to look for. This skill of route-finding is intimately connected to your footwear; trusting your shoe’s edging ability and sticky rubber is what gives you the confidence to commit to these subtle, natural holds.
Instead of looking for a blatant trail of chalk, train your eyes to spot the more nuanced signs of a traveled path. Rock features that are frequently used as handholds and footholds develop a distinct patina. Learning to identify these markers is a fundamental outdoor skill, turning a seemingly blank face of rock into a readable map. It shifts your reliance from external markers to your own observation skills and your trust in your equipment. The most experienced climbers leave minimal trace, and learning to follow their subtle signs is part of a sustainable interaction with the environment.
To develop this skill, focus on this three-tiered technique for reading the route:
- Spot the Polish: Look for rock surfaces that are shinier or smoother than their surroundings. The texture of frequently used footholds gets worn down over time by the friction of countless shoes, creating a subtle polish.
- Identify the Absence of Lichen: On many rock types, traveled routes are distinguished by what’s missing. Critical hand and footholds will be clean and bare, scraped free of the lichen and moss that covers adjacent, untouched rock.
- Notice the Darkening of Handholds: The natural oils and dirt from climbers’ hands can subtly darken the rock on popular handholds. This can help distinguish a positive, usable hold from other features on the wall.
Ultimately, learning to read the rock is about building a respectful relationship with the natural environment. It’s a skill that deepens your connection to the climb and reinforces the core spirit of self-reliance that defines both hiking and climbing.
Approach Shoes or Hiking Boots: What Grips Best on Slippery Algae?
Few surfaces are as treacherous as wet rock covered in a thin film of algae or slime. On this terrain, the standard rules of grip are inverted. The deep, aggressive lugs of a traditional hiking boot, designed to bite into soft earth, are ineffective. They are too hard and widely spaced to gain purchase on the slick biofilm. Similarly, the flat, sticky rubber of a climbing-focused approach shoe can struggle to break the surface tension of the slippery layer, effectively hydroplaning. Optimal grip on algae requires a completely different design philosophy.
The key to conquering slippery, wet surfaces lies in a combination of a soft rubber compound and a specific lug geometry. As iRunFar’s testing team notes, “Deep lugs will dig through the goop to find purchase on rock or firmer soil beneath.” However, on hard, algae-covered rock, there is nothing to dig into. The solution is a sole that maximizes surface area contact while actively channeling the lubricating film away. This involves using shallower lugs (around 4-6mm) with a high degree of “siping”—thin slits cut into the rubber that improve flexibility and create more biting edges to displace water and slime.
This table compares the engineering features of different footwear types and their effectiveness on algae-covered surfaces.
| Feature | Deep Lugs (Hiking Boots) | Flat Sticky Rubber (Climbing Shoes) | Optimal Anti-Algae Design |
|---|---|---|---|
| Rubber Compound | Harder, durable compound | Softer, maximum grip compound | Softer rubber for better conformity to irregular surfaces |
| Lug Pattern | Deep 8-10mm lugs, widely spaced | Flat/minimal tread | Wider, shallower lugs (4-6mm) with heavy siping to channel water/slime |
| Performance on Algae | Cannot penetrate biofilm, lugs can’t grip | Cannot break surface tension of slippery film | Maximizes surface contact while channeling lubricating layer |
| Shoe Flexibility | Stiff for support | Moderate to stiff | More flex for better ground feel and adaptation to rock shape beneath algae |
Therefore, when anticipating exceptionally slick conditions, neither a standard hiking boot nor a rock-centric approach shoe is the ideal tool. The best choice is a shoe designed with water in mind, often found in the trail running or canyoneering categories, which incorporates a soft, siped outsole that can conform to the rock and displace the slippery film.
Key Takeaways
- An approach shoe’s performance is defined by its engineering trade-offs, not a list of features.
- The balance between sticky rubber (grip) and a harder compound (durability) is the most fundamental choice in sole design.
- Fit is a compromise between a tight, precise toe box for climbing and a roomier, more comfortable shape for hiking.
Preparing for Active Travel: How to Train for a Hiking Trip 3 Months in Advance?
Selecting the right approach shoe is only half the equation; preparing your body to use that specific tool is the other. Approach shoes typically offer less cushioning and ankle support than traditional hiking boots. Their stiffer chassis, designed for edging, also places different demands on your feet and lower legs. Simply buying a pair of approach shoes a week before a big trip is a recipe for discomfort and potential injury. A dedicated break-in and conditioning period is essential to allow your feet to adapt and to build the specific strength required.
Training in your approach shoes serves two purposes. First, it molds the shoe to the unique shape of your foot, revealing potential hot spots before they become trip-ending blisters. Second, it conditions your body. The reduced support requires your ankles and the smaller stabilizing muscles in your feet to work harder. Gradually increasing mileage and pack weight in your approach shoes builds the resilience needed to handle long days on the trail. This is not just about logging miles; it’s about targeted physical preparation for the specific mechanical demands of your chosen footwear.
Case Study: Dual-Shoe Strategy on a 70+ Mile Route
An extreme example of preparing for a shoe’s strengths is documented on a three-day, 70+ mile journey from Milner to Berthoud Pass. The climber used a dual-shoe strategy, wearing a super-cushioned trail runner for the long-distance running sections to preserve his feet. For the numerous technical 5th-class pitches, he carried and switched into lightweight La Sportiva TX2 approach shoes. This demonstrates a deep understanding of tool optimization: he had conditioned his body to not only use each shoe for its intended purpose but also to efficiently manage the system mid-route, accepting a weight penalty in exchange for peak performance and injury prevention.
A three-month training window is ideal for fully integrating a new pair of approach shoes and conditioning your body. This structured protocol links your training directly to the shoe’s technical purpose.
- Months 1: Foundation (Weeks 1-4): Start with short walks (1-2 hours) on varied terrain. This begins the break-in process and helps you identify any fit issues early on.
- Month 2: Build-Up (Weeks 5-8): Progress to half-day hikes (4-6 hours) with a light pack and moderate elevation gain. Focus on ankle-strengthening exercises like single-leg balances and calf raises.
- Month 3: Specificity (Weeks 9-12): Undertake full-day hikes with your target pack weight. Actively seek out scrambling opportunities, or simulate them on steep hills, stairs, or even in a bouldering gym to practice precise footwork.
By deconstructing the engineering behind your footwear and aligning your physical preparation with its design, you can select and use approach shoes with the confidence of a professional. The next step is to analyze your own needs and begin evaluating shoes not as products, but as systems designed to solve a specific problem.