The secret to bridging the gap between rugged camping and refined comfort lies in ‘curated comfort’—selectively upgrading key sensory experiences rather than simply buying expensive gear.
- Elevating sleep systems and campsite cuisine provides foundational comfort that transforms the outdoor experience.
- Sophisticated lighting and silent power create a relaxing ambiance without sacrificing the connection to nature.
Recommendation: Focus on mastering three areas—sleep, food, and ambiance—to create a compromise that feels like an upgrade for both the traditional camper and their comfort-loving partner.
The classic camping dilemma often sounds like a standoff. On one side, the purist who believes authenticity is measured in freeze-dried meals and a slightly deflated sleeping pad. On the other, the partner for whom the phrase “roughing it” is a deal-breaker, envisioning a weekend of discomfort. The common advice—to just go “glamping”—often misses the point entirely. It suggests a passive, pre-packaged experience that can feel disconnected from the very nature you came to enjoy, erasing the traditional camper’s sense of accomplishment and connection.
This approach creates a false dichotomy, forcing a choice between spartan authenticity and sterile luxury. But what if the solution wasn’t about replacement, but elevation? What if the key to a successful compromise lay not in buying a different kind of tent, but in thoughtfully redesigning the experience within it? The answer is to embrace a philosophy of curated comfort. It’s an intentional approach that focuses on strategically upgrading the key sensory touchpoints of a camping trip—how you sleep, what you eat, and the atmosphere you create—to build a bridge between two very different expectations.
This guide moves beyond the generic advice. We will not just list gear; we will explore the principles of experience architecture for the outdoors. We’ll deconstruct how to achieve a five-star feeling under the stars, from engineering the perfect camp bed to orchestrating a three-course meal on a simple stove. It’s about making smart, impactful choices that enhance well-being without breaking the spell of the wild, proving that comfort and authenticity can not only coexist but enrich each other.
To navigate this path, this article is structured to address the most critical elements of campsite comfort. From the foundation of a good night’s sleep to the nuances of ethical engagement, each section provides a blueprint for creating an elevated outdoor experience that everyone can love.
Summary: Elevating Traditional Camping: How to Blend Luxury and Nature Without Losing Authenticity?
- Air Mattress vs Memory Foam: Which Portable Bed Feels Like Home?
- Beyond Hot Dogs: How to Cook a 3-Course Meal on a Two-Burner Stove?
- String Lights and Lanterns: How to Light Your Site Without Looking Like a Carnival?
- Portable Power Stations: How to Keep Devices Charged for a Week of Glamping?
- Propane vs Wood Fire: Which Heater Is Safe Inside a Canvas Tent?
- The Fishbowl Effect: How to Maintain Privacy in a Transparent Room?
- Local Staff vs Expats: Does Your Money Really Stay in the Community?
- Staying in Nordic Glass Domes: Is the Price Worth the View of the Aurora?
Air Mattress vs Memory Foam: Which Portable Bed Feels Like Home?
The first and most critical battleground in the comfort compromise is sleep. A night spent tossing on a lumpy, cold air mattress is often the primary reason a comfort-seeker vows never to camp again. The dreaded midnight deflation or the feeling of every pebble beneath you is a direct assault on well-being. To truly elevate the experience, the goal isn’t just to avoid discomfort; it’s to replicate the restorative quality of your bed at home. This is where the debate between traditional air mattresses and modern portable memory foam systems becomes central.
While air mattresses are lightweight and packable, their value diminishes in a car-camping or glamping context where space is less of a concern. Their fundamental flaw is uneven support and poor thermal insulation. The air inside circulates, pulling warmth away from your body and creating a cold sleeping surface. In contrast, high-density or memory foam mattresses offer a transformative upgrade. As camping gear specialists point out, memory foam provides superior pressure relief by conforming to your body’s contours, significantly improving sleep quality. This is the essence of sensory elevation—it directly addresses the physical complaints of a bad night’s sleep.
The practical differences are stark, highlighting why a foam mattress is a superior investment for curated comfort. As this comparative analysis from Better Trail demonstrates, the choice impacts everything from setup time to long-term durability.
| Feature | Air Mattress | Memory Foam |
|---|---|---|
| Setup Time | 5-10 minutes (inflation required) | Under 5 seconds (unroll and ready) |
| Thermal Insulation | Poor (air circulates, pulls heat away) | Excellent (static air pockets, R-value 8.8) |
| Pressure Relief | Concentrated pressure points, uneven support | Distributed force across larger surface area |
| Durability Risk | Puncture-prone, deflation overnight | Cannot pop, maintains support |
| Lifespan | Shorter (PVC degradation) | 8-10 years with proper care |
| Best Use Case | Backpacking (lightweight, packable) | Car camping, glamping (comfort priority) |
As the Amerisleep Testing Team concludes, “For car camping or RV use, memory foam offers far superior comfort and won’t deflate overnight.” Choosing a quality foam mattress isn’t just buying a piece of gear; it’s a strategic investment in the entire trip’s success, ensuring both partners wake up refreshed and ready to enjoy the day, not complain about the night.
Beyond Hot Dogs: How to Cook a 3-Course Meal on a Two-Burner Stove?
After sleep, food is the next frontier for sensory elevation. For the traditional camper, a meal cooked over a fire is a rustic joy. For the comfort-seeker, the thought of hot dogs and canned beans for a weekend can feel like a punishment. The challenge is to bridge this gap, proving that gourmet-level meals are not only possible but can be effortlessly executed with limited equipment. The secret isn’t a complex camp kitchen; it’s a strategy of front-loading the preparation at home.
This “mise en place” approach transforms campsite cooking from a stressful, chaotic chore into a smooth, enjoyable assembly process. By pre-chopping vegetables, mixing sauces, and even pre-cooking proteins, you minimize the work done on-site. This allows you to produce sophisticated dishes like Pad Thai or a rich stew in the time it would take to roast a hot dog, leaving more time to actually enjoy the sunset. This method respects the constraints of the outdoors while delivering the quality of a home-cooked meal.
Case Study: The Two-Burner, Three-Course Success
A camping food blogger demonstrated a powerful proof of concept by preparing a sophisticated three-course meal using only a two-burner stove. The process began with an appetizer on one burner while water boiled on the second for the main. The main course, a chicken Pad Thai using a pre-made sauce, was cooked in a single skillet in under 20 minutes. For dessert, the meal transitioned to a Dutch oven placed over campfire coals for a hands-off cobbler. This act created an intentional link to traditional camping while maintaining efficiency. The key insight was clear: extensive prep work at home transformed the cooking experience from stressful to delightful, creating more time for nature.
To implement this strategy, focus on creating meal kits at home. Group ingredients by meal, package custom spice blends, and prepare any complex sauces in advance. This approach not only elevates the dining experience but also significantly reduces the amount of gear and cleanup required at the campsite, a win for both the minimalist and the comfort-lover.
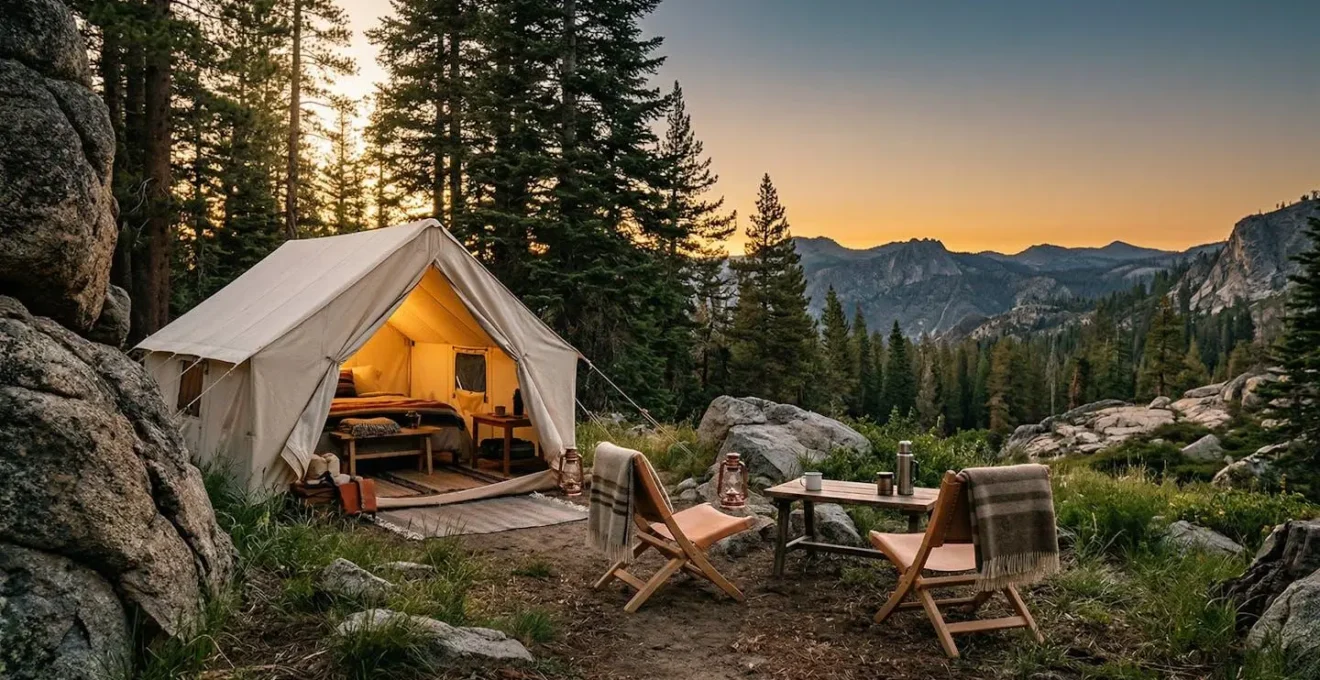
String Lights and Lanterns: How to Light Your Site Without Looking Like a Carnival?
Campsite ambiance is a subtle but powerful element of curated comfort. Poor lighting—either a single, blindingly harsh lantern or a chaotic explosion of colorful string lights—can make a serene natural setting feel stressful or tacky. The goal is to create an atmosphere that is both functional and sophisticated, a warm and intimate sanctuary rather than a public spectacle. This requires thinking like a lighting designer and applying the “Three Layers of Light” model, a principle used in residential design, to the outdoors.
This model prevents the two most common mistakes: over-lighting and flat-lighting. Instead of a single powerful source, you layer different types of light to create depth and purpose:
- The Ambient Layer: This is the general, soft-glow foundation. Use warm, low-hung string lights directed downward to create a cozy perimeter without causing light pollution. According to lighting industry research, 2700K warm white is the most preferred color temperature for creating a welcoming outdoor atmosphere.
- The Task Layer: This provides focused, functional light for specific activities. A well-placed lantern on the cooking table, a headlamp for gathering firewood, or a small lamp for reading in the tent ensures you can see what you’re doing without flooding the entire site with harsh light.
- The Accent Layer: This uses low-intensity lights, like small path markers or corner tent lights, to define the space, add visual interest, and enhance safety without destroying the night-sky view.
This layered approach creates a dynamic, inviting space that feels intentionally designed. The image below illustrates how these layers work together to form a cohesive and intimate environment, a far cry from the “carnival” look.
As you can see, the key is control and direction. By keeping lights low, aimed downward, and using dimmers where possible, you preserve the darkness beyond your immediate bubble, maintaining that crucial connection to the wild. This thoughtful approach to “experience architecture” is what separates a generic campsite from a truly elevated outdoor retreat.
Portable Power Stations: How to Keep Devices Charged for a Week of Glamping?
In the modern comfort compromise, access to power is often a non-negotiable. Whether it’s for charging a Kindle, powering a Bluetooth speaker, or keeping a portable projector running for a movie night under the stars, reliable energy is a cornerstone of curated comfort. However, the traditional solution—a noisy, fume-producing gas generator—is the antithesis of a serene nature experience. This is where portable power stations have become a game-changer, offering silent, clean, and safe energy.
These devices are essentially large, rechargeable batteries with multiple outlets (AC, DC, USB). The key to successfully using one for a week-long trip is not buying the biggest one, but accurately calculating your energy needs through a simple “campsite energy audit.” Instead of guessing, you can map out your consumption to choose a station with the right capacity, ensuring you have enough power without overpacking.
Your Campsite Energy Audit Checklist
- List Your Devices: Inventory every device you plan to power and find its wattage (e.g., phone charger: 10W, LED string lights: 20W, portable mini-fridge: 40W).
- Calculate Peak Wattage: Add up the wattage of devices you’ll use simultaneously. For example, an evening with lights, a speaker, and phone charging might peak at 70W.
- Estimate Daily Watt-Hours (Wh): Multiply your peak wattage by the hours of use to find your daily energy budget (e.g., 70W x 4 hours = 280Wh).
- Add a 20% Buffer: No battery is 100% efficient. For 280Wh of daily use, you need a station with at least 336Wh of capacity per day.
- Plan for Recharging: For week-long autonomy, pair your power station with a solar panel. A 100W panel can generate 400-500Wh on a sunny day, effectively making your energy supply infinite.
Beyond the practicalities, the choice of a power station reinforces the ethos of modern, respectful camping. As the Anker SOLIX Product Team notes:
Portable power stations operate quietly with zero emissions and are safe for indoor and outdoor use, unlike traditional generators that produce noise and exhaust.
– Anker SOLIX Product Team, Portable Power Stations vs Traditional Generators Guide
Furthermore, their sustainability is a major advantage. Many modern stations use LiFePO4 batteries, which offer a significantly longer lifespan. According to battery technology specialists, these units can last for over 6,000 recharge cycles, making them a far more sustainable choice than fossil-fuel generators for years of trips to come.
Propane vs Wood Fire: Which Heater Is Safe Inside a Canvas Tent?
Extending the camping season into the cooler months is a fantastic way to experience nature’s quieter moments, but it introduces a critical comfort challenge: warmth. For a comfort-seeking partner, being cold is an absolute deal-breaker. While a crackling campfire is perfect for outdoor ambiance, heating the inside of a tent requires a dedicated and, above all, safe solution. The debate often centers on portable propane heaters versus small, tent-safe wood stoves.
Propane heaters are convenient, easy to use, and offer instant, adjustable heat. Models designed for indoor use come equipped with essential safety features like an automatic shut-off if they tip over or if low oxygen levels are detected. This makes them a popular choice for canvas or bell tents where maintaining a comfortable temperature overnight is key. They are the epitome of “set it and forget it” comfort.
Wood-burning tent stoves, on the other hand, appeal to the traditionalist. They provide a dry, intense heat and a mesmerizing focal point inside the tent. However, they require a proper stove jack installation, constant tending, and careful management of embers and exhaust. While they offer a powerful and authentic heating experience, they represent a higher level of commitment and vigilance.
Regardless of the choice, safety is paramount and goes beyond just the heater itself. The real challenge is managing the tent’s internal microclimate. As one outdoor safety expert warns, the focus must shift from simply generating heat to maintaining a healthy environment.
Even safe heaters require significant ventilation to prevent moisture buildup which makes you feel cold and damp and CO2 accumulation, shifting focus to creating a healthy indoor microclimate.
– Outdoor Safety Expert, Canvas Tent Heating Safety Guidelines
This is a crucial insight. Without proper airflow, any heater will cause condensation to form on the tent walls, leading to a damp, clammy feeling that negates the warmth. Therefore, the safest and most comfortable approach involves a dual strategy: using an approved indoor-safe heater (propane for convenience, wood for authenticity) and ensuring constant cross-ventilation by cracking a window and a door, even when it’s cold. This allows moisture and any potential fumes to escape, creating a dry, warm, and safe sanctuary.
The Fishbowl Effect: How to Maintain Privacy in a Transparent Room?
A significant, though often overlooked, aspect of comfort is privacy. For someone new to camping, the thin walls of a tent can create a “fishbowl effect”—a feeling of being exposed to the sights and sounds of a busy campground. This psychological discomfort can undermine even the most luxurious physical setup. Achieving a sense of seclusion is therefore a critical part of the comfort compromise, and it begins long before you even pitch the tent. The most powerful tool for privacy is strategic site selection.
Instead of choosing the most convenient or open spot, train your eye to read the landscape for natural barriers. Look for sites that are tucked away, using the terrain to your advantage. A spot nestled behind a cluster of large boulders, within a grove of trees, or in a slight dip in the land can create a private amphitheater, shielding you from neighbors. This not only provides visual privacy but also helps to dampen sound, enhancing the feeling of being in your own secluded world.
The following principles can guide your search for the perfect private haven:
- Use Natural Features: Actively seek out sites with boulders, dense tree clusters, or terrain variations that create natural walls.
- Maintain a Buffer Zone: Choose a site at least 200 feet away from high-traffic areas like main trails, restrooms, or water sources to minimize foot traffic and noise.
- Look for Windbreaks: Bushes and rock formations that block wind also block sightlines, offering a dual benefit of shelter and seclusion.
- Favor the Forest Edge: A site on the edge of a clearing offers the best of both worlds—privacy from the dense trees behind you and an open view in front.
This aerial view demonstrates how a thoughtfully chosen site uses the natural landscape to create a sheltered and private space, effectively eliminating the fishbowl effect.
By prioritizing a site with natural screening, you create a sanctuary that feels safe and personal. This proactive approach to “experience architecture” addresses the need for privacy at its source, providing a sense of comfort that no gear alone can replicate and reinforcing the feeling of an exclusive escape.
Local Staff vs Expats: Does Your Money Really Stay in the Community?
While the title suggests a focus on resort staffing, its core question—about the true impact of our stay—is profoundly relevant to the self-sufficient camper. As we elevate our camping experience with curated comforts, there’s a risk of creating a self-contained luxury bubble, disconnected from the place we are visiting. For the traditional camper, authenticity is tied to a genuine connection with the environment. We can honor this value by ensuring our trip contributes positively to the local ecosystem and economy, moving beyond a purely extractive mindset.
This is a crucial part of maintaining the “authenticity threshold”—the line where glamping becomes disconnected. Instead of seeing the local area as just a scenic backdrop, we can actively engage with it. This approach enriches the experience for both the comfort-seeker, who gets access to fresh, high-quality local goods, and the traditionalist, who deepens their connection to the place. This ethical engagement transforms a simple camping trip into a more meaningful and sustainable act.
Adopting a few local sourcing principles can make a significant difference:
- Buy Firewood Locally: Always purchase firewood at or near your campsite. This is the number one rule to prevent the spread of invasive insect species that can devastate local forests, and it directly supports local vendors.
- Source Food from Farm Stands: Bypass the supermarket on your way out of town. Stopping at a roadside farm stand or local farmers market connects you to the regional food system, provides fresher ingredients for your gourmet meals, and reduces packaging waste.
- Rent Gear from Local Outfitters: If you need a kayak or a specific piece of equipment for an activity, rent it from a local shop. This supports the local economy and gives you access to invaluable expert advice on the best places to explore.
- Pay for Park Passes and Permits: The revenue from local park passes and land-use permits directly funds the maintenance of trails, facilities, and conservation efforts in the very area you are enjoying.
By making these conscious choices, you shift from being a mere consumer of scenery to a participant in the local community and its preservation. It’s a powerful way to ensure that your pursuit of comfort doesn’t come at the cost of authenticity, but instead enhances it.
Key Takeaways
- True camping elevation comes from ‘curated comfort’—strategic upgrades to sleep, food, and ambiance, not just expensive gear.
- Front-loading prep work at home is the secret to creating gourmet meals on a simple two-burner stove, transforming campsite dining.
- A layered lighting approach and strategic site selection are crucial for creating a sophisticated and private atmosphere that avoids the “fishbowl effect.”
Staying in Nordic Glass Domes: Is the Price Worth the View of the Aurora?
The pinnacle of the glamping dream is often an image of a Nordic glass dome, with the Aurora Borealis dancing overhead—an experience that comes with a hefty price tag. This raises the ultimate question in our comfort compromise: is that level of luxury necessary to have a profound experience with nature? The answer, revealed by deconstructing what makes these stays so special, is a resounding no. The magic isn’t in the glass dome itself; it’s in the principles it embodies—principles you can replicate with your own curated setup.
The exploding global popularity of glamping is driven by a desire for deeper engagement with nature, combined with an upscale approach to comfort. But a closer look at these high-end retreats reveals their core value propositions are surprisingly accessible.
Case Study: Deconstructing the Luxury Dome Experience
An analysis of luxury glamping retreats shows that their memorable quality stems from a few key design principles, not the expensive structures. The first is a panoramic view, achieved through strategic positioning. The second is a premium sleep system, often featuring high-quality foam mattresses and fine linens. The third is excellent thermal regulation. All three of these elements are replicable. A traditional camper can achieve a panoramic view by carefully selecting a site and orienting their tent’s entrance. A premium sleep system can be created with a quality memory foam camp mattress. Thermal regulation comes from a safe heater and proper ventilation. The real luxury, then, is witnessing a unique natural phenomenon—like the Aurora—from a comfortable basecamp. Your own well-curated gear can serve as this launchpad for countless future experiences, offering far greater value than a single expensive night.
This is the ultimate realization of the “curated comfort” philosophy. It’s not about replicating a glass dome; it’s about understanding *why* a glass dome is appealing and then capturing that essence with your own thoughtful choices. The goal is to have a front-row seat to nature’s wonders, whether it’s a meteor shower, a wildlife migration, or a simple, stunning sunset. Your elevated camping setup becomes the comfortable, personal, and endlessly reusable theater for these moments.
This final insight empowers both the traditional camper and the comfort-seeker. It proves that you don’t need to spend a fortune to achieve a five-star experience. You simply need to be a good architect of your own adventure.
The journey from a basic campsite to an elevated outdoor sanctuary is one of thoughtful choices, not lavish spending. By focusing on curating comfort where it matters most, you can design an experience that honors both the authentic spirit of camping and the deep human need for well-being. Start by upgrading your sleep system and planning your camp kitchen to build a foundation of comfort and satisfaction.