Contrary to popular belief, successful survival foraging isn’t about knowing hundreds of edible plants—it’s about mastering the caloric economics of a select few.
- Focus on high-ROI foods like nuts, roots, and acorns that deliver maximum calories for the energy spent in harvesting and processing.
- Prioritize safety above all else; misidentification carries a risk that no amount of calories can justify.
Recommendation: Adopt a “confluence of evidence” mindset for identification and always weigh the caloric cost of acquisition before you harvest.
Imagine the scenario: you’re deep in the backcountry, a few days’ hike from the nearest trailhead, and your food supplies are critically low. The lush greenery around you seems like a buffet, and you recall hearing that dandelions, clover, and other common weeds are edible. While true, nibbling on trailside greens is a strategy for a slow starvation. In a genuine survival situation, the game isn’t about finding something edible; it’s a brutal match of caloric economics. Your body is a battery, and every action—walking, digging, even thinking—drains its power. The only way to win is to find foods that provide a significant caloric return on investment (ROI).
Most foraging guides focus on simple identification, creating a dangerous illusion of abundance. They fail to teach the most critical survival skill: calculating the net energy gain. A handful of berries is a welcome treat, but it won’t replace the energy spent hiking a mile to find them. True survival foraging means ignoring the low-calorie “survival salads” and focusing exclusively on calorie-dense powerhouses: starchy roots, fatty nuts, and carbohydrate-rich seeds. These are the foods that can genuinely sustain you, but they often come with a cost—they may require difficult harvesting, extensive processing to remove toxins, or expert-level identification to avoid deadly lookalikes.
This guide cuts through the noise. We will shift the focus from a simple scavenger hunt to a strategic assessment of energy economics. We’ll explore how to identify and process the highest-value wild foods, from the tannin-leached acorn to the starchy cattail rhizome. We will also cover the non-negotiable safety protocols for avoiding poisonous mimics and the legal framework that governs harvesting. It’s time to stop thinking like a grazer and start thinking like a survivalist, where every calorie counts.
To navigate this essential topic, this article breaks down the critical components of high-efficiency foraging. The following sections will guide you through identifying high-calorie targets, processing them safely, and understanding the risks and rules of the landscape.
Contents: A Guide to High-Calorie Foraging
- The Death Cap: How to Distinguish It from Edible Paddy Straw Mushrooms?
- Winter Foraging: Where to Find Edible Roots Under the Snow?
- Leaching Tannins: How to Make Acorns Edible Without Bitter Taste?
- Public vs Private Land: Where Is It Legal to Harvest Wild Edibles?
- Raw vs Boiled: Which Preparation Method Unlocks Nutrients in Nettles?
- Water Hemlock vs Wild Carrot: The Distinctions That Save Your Life
- The Town Trap: How Hotels and Burgers Destroy Your Thru-Hike Budget?
- Planning Expedition Logistics: How to Secure Permits for Restricted Wilderness Areas?
The Death Cap: How to Distinguish It from Edible Paddy Straw Mushrooms?
In the world of caloric economics, a fatal mistake represents the ultimate negative return. The Death Cap mushroom (Amanita phalloides) is the single most dangerous risk a forager can encounter. Responsible for an estimated 90% of mushroom-related fatalities worldwide, its innocent appearance belies a toxin for which there is no simple antidote. It often grows in the same areas as edible species, including the prized Paddy Straw mushroom, making identification skills a matter of life and death. The initial symptoms of poisoning are deceptively mild and delayed, often leading victims to believe they have a simple stomach bug until it is too late for effective medical intervention.
The key to distinguishing a Death Cap from an edible lookalike like the Paddy Straw mushroom lies not in the cap, but at the base. Every forager must excavate the entire mushroom, including the part below the soil line. The Death Cap emerges from a distinct, cup-like sac called a volva. The Paddy Straw mushroom has no such structure. This single feature is the most reliable differentiator.
As the image above illustrates, this bulbous base is a non-negotiable checkpoint. Other features, like the Death Cap’s greenish-yellow cap, white gills, and a skirt-like ring on the stem (annulus), are also important identifiers. However, these can vary or degrade with age. The presence of a volva is the definitive red flag. If you find a mushroom with a sac at its base, it is not a Paddy Straw. The caloric gain from any mushroom is zero if the cost is your life. Never consume a wild mushroom without 100% positive identification.
Winter Foraging: Where to Find Edible Roots Under the Snow?
Winter foraging presents the ultimate challenge in caloric ROI. The energy expenditure required to dig through frozen ground is immense, and many plants have died back, leaving few clues on the surface. However, for those who can read the “ghost landscape,” winter holds some of the most calorie-dense foods available: starchy roots and rhizomes. These are the plant’s energy reserves, packed with carbohydrates to fuel next season’s growth. The key is not to dig randomly, but to identify the skeletal remains of last season’s most productive plants.
Look for the tall, dark, hooked-bur-covered stalks of Burdock (Arctium) or the fuzzy brown, cigar-shaped seed heads of Cattails (Typha) poking through the snow. These are signposts pointing directly to the energy-rich taproots and rhizomes below. Cattail rhizomes are particularly valuable; a single cup of the extracted starch can provide around 150 calories, a significant return for the effort if the ground is workable. The strategy involves targeting microclimates—south-facing slopes, riverbanks, and areas near springs—where the ground is less frozen and digging is more energy-efficient.
Always perform a cost-benefit analysis. If you are spending hundreds of calories chipping away at frozen earth for a small root, you are losing the game. At that point, your energy is better spent on lower-effort, lower-reward tasks like gathering pine needles for a vitamin C-rich tea or finding shelter. Winter survival is about making smart energy bets, and knowing when to fold is as important as knowing where to dig.
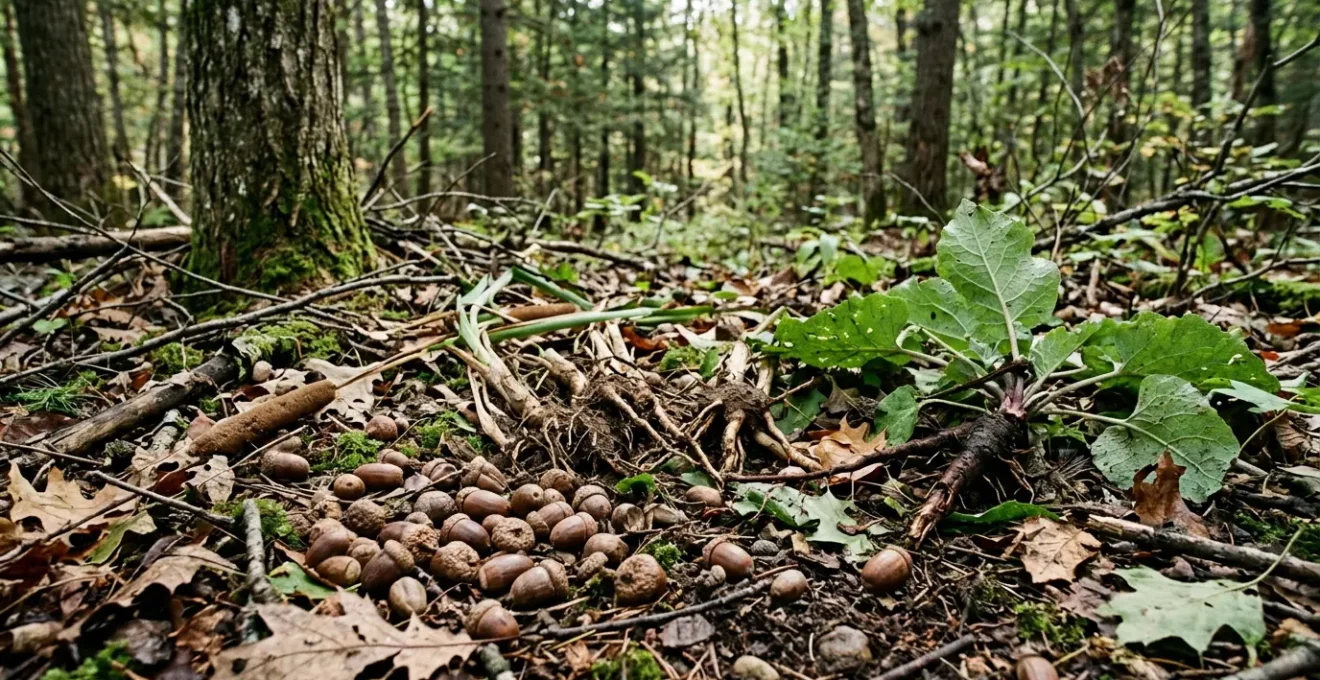
Leaching Tannins: How to Make Acorns Edible Without Bitter Taste?
Acorns are one of the most abundant and calorically dense wild foods available in many temperate forests. Raw acorns are inedible due to high concentrations of bitter, gut-irritating tannins. However, with proper processing, they become a powerhouse of fat, carbohydrates, and protein. The process of removing these water-soluble tannins is called leaching, and mastering it unlocks a vital survival food source. The strategic choice of leaching method depends entirely on your available resources: time, fuel, and access to water.
There are two primary approaches: cold water leaching and hot water boiling. Cold leaching is fuel-free but time-intensive, making it ideal for a fixed camp or a thru-hiker who can perform the process while resting. Hot water leaching is fast, requiring only an hour or two, but it consumes a significant amount of precious fuel, making it a poor choice when firewood is scarce or needs to be conserved for warmth. The method you choose directly impacts your overall energy budget.
The following table, based on an analysis of traditional preparation methods, breaks down the trade-offs of each technique, including a passive “hobo” method for those on the move.
| Method | Time Required | Fuel/Energy Cost | Nutrient Preservation | Best Use Case |
|---|---|---|---|---|
| Cold Water Leaching | 1-2 days (multiple water changes) | Zero fuel required | Preserves starches and fats for binding in flour | Making acorn flour for baking; thru-hiking scenarios with time |
| Hot Water Boiling | 1 hour (3-4 water changes) | Significant fuel required | Removes oils; cooks starch (reduces binding properties) | Immediate consumption; when fuel is abundant |
| Stream Leaching (Hobo Method) | 1-2 days (passive) | Zero fuel, minimal effort | Preserves nutrients while on the move | Thru-hikers; bug-out scenarios with flowing water access |
Choosing the right method is a classic survival calculation. If you have abundant dry fuel, boiling is efficient. If you are conserving fuel for warmth or are constantly moving, a passive cold-water method is superior. Understanding this energy trade-off is the difference between a net caloric gain and a net loss.
Public vs Private Land: Where Is It Legal to Harvest Wild Edibles?
The caloric ROI of a wild edible becomes catastrophically negative if harvesting it results in a hefty fine or a criminal charge. Before you pick a single berry or dig a single root, you must know whose land you are on and what the rules are. The legal landscape of foraging is a complex patchwork of federal, state, and local regulations that vary dramatically from one jurisdiction to another. Assuming you can forage anywhere that looks “wild” is a dangerous and costly mistake.
In the United States, for example, general foraging for personal use is often permitted on lands managed by the Bureau of Land Management (BLM) and in many National Forests. However, National Parks have a near-universal ban on harvesting anything. State parks, county lands, and city parks each have their own specific rules. The only way to be certain is to do your homework. Using a GPS-enabled app with land ownership overlays (like OnX Hunt or Gaia GPS) is the first step to identifying the managing agency.
Once you know the jurisdiction, you must find the specific regulations. This isn’t just about whether foraging is allowed, but also about quantity thresholds. “Personal use” might be defined as one gallon of berries or five pounds of mushrooms. Exceeding that limit, or selling any amount, often pushes you into commercial territory, which requires expensive permits and has stricter rules. The most effective survivalists create a personal legal map of their operational area before they ever need it.
Your Action Plan: Creating a Personal Foraging Legal Map
- Identify land jurisdiction: Use GPS apps (OnX Hunt, Gaia GPS) to determine if land is National Forest (USFS), Bureau of Land Management (BLM), National Park (NPS), State Park, or private property.
- Research agency-specific keywords: Search for ‘forest product permit’, ‘special use permit’, ‘personal use harvest’, or ‘recreational foraging’ on the managing agency’s website.
- Contact local offices: Call the specific ranger district or BLM field office to confirm current regulations, as rules vary dramatically even within the same agency.
- Understand quantity thresholds: Personal use typically means small amounts; exceeding these limits or selling any amount may require commercial permits.
- Check for area-specific closures: Research Natural Areas, Wilderness Areas, and special management zones often prohibit all foraging regardless of general agency policy.
Raw vs Boiled: Which Preparation Method Unlocks Nutrients in Nettles?
Stinging Nettle (Urtica dioica) is a nutritional superstar of the wild food world, packed with vitamins and minerals. However, its formidable defense mechanism—tiny, hair-like needles that inject a cocktail of irritating chemicals—makes it unapproachable in its raw state. The question for the survivalist is how to neutralize the sting while maximizing nutrient retention, all within a sound energy budget. Simply boiling nettles is the most common method, as heat quickly and effectively denatures the stinging compounds, rendering the plant safe to eat as a cooked green.
While boiling is effective, it has a downside: many water-soluble vitamins are lost in the cooking water. For a quick, hot meal, this is an acceptable trade-off. However, for a long-term survival or thru-hiking strategy where nutrient density is paramount, there is a more advanced technique.
Case Study: Nettle Dehydration for Nutrient-Dense Survival Powder
Survival foraging experts advocate for a two-step process to create a lightweight, shelf-stable, and nutritionally concentrated food. First, the nettles are briefly blanched in hot water or crushed (e.g., with a smooth stone) to neutralize the sting. Then, they are dehydrated until brittle. The dried leaves are then crushed into a fine powder. This “nettle powder” can be stored for months and added to any meal—soups, stews, or even just hot water—to provide a massive boost of minerals and vitamins. This method requires a higher initial energy investment (for blanching and drying) but yields a far superior product for long-distance travel where every ounce of pack weight matters.
This approach transforms nettles from a simple pot-herb into a strategic nutritional supplement. It perfectly illustrates the principle of investing energy upfront to create a high-value, low-weight resource for the future. The choice between boiling for immediate consumption and processing for a nutrient-dense powder depends entirely on the context of your survival timeline.
Water Hemlock vs Wild Carrot: The Distinctions That Save Your Life
No discussion of foraging is complete without addressing the deadly members of the Apiaceae (Carrot) family. Water Hemlock (Cicuta maculata) is arguably the most violently toxic plant in North America. It is often mistaken for its edible relative, Wild Carrot (Daucus carota), also known as Queen Anne’s Lace. This is not a mistake you can make twice. A single bite of Water Hemlock root can be fatal. The principle of caloric ROI demands an infallible system for identification, because the risk here is absolute.
Relying on a single feature is a recipe for disaster. Instead, a survivalist must use a “Confluence of Evidence” protocol, where multiple key characteristics must all match before a plant is deemed safe. If even one feature does not align, the plant must be discarded without question. This mental discipline is the most critical survival skill of all.
Your Action Plan: Confluence of Evidence Protocol for Deadly Lookalikes
- Feature 1: Stem examination: Water Hemlock has a smooth, often purple-splotched, hollow stem. Wild Carrot has a hairy, solid green stem. A single mismatch means ‘no-go’.
- Feature 2: Root structure check: Hemlock has a chambered root (multiple empty chambers visible when cut vertically). Wild Carrot has a solid taproot like a garden carrot.
- Feature 3: The smell test: Crush a small piece of leaf. Wild Carrot has an unmistakable carrot-like scent. Water Hemlock has a foul, musty, or ‘parsnip-like’ odor.
- Feature 4: Cultivate absolute certainty: The foundational rule is “If in ANY doubt, throw it out.” Foraging is not a guessing game. Reject anything without the confluence of multiple positive identifications.
This systematic approach removes guesswork and emotion from the equation. It’s about data collection, not wishful thinking. As survival expert Paul Kirtley emphasizes, the goal of survival foraging is not to feast, but to sustain basic bodily functions. In his article, “Survival Foraging: A Realistic Approach,” he provides a critical perspective:
Studies have shown that taking on only 500 calories of starchy, carbohydrate-filled plant food per day will maintain your digestive functions and provide enough energy to significantly reduce muscle loss compared to eating nothing.
– Paul Kirtley, Survival Foraging: A Realistic Approach
This quote frames the entire practice perfectly. We are seeking functional calories, not culinary delights. The risk of consuming Water Hemlock for a few potential calories is a fool’s bargain. Master the protocol, and live.
The Town Trap: How Hotels and Burgers Destroy Your Thru-Hike Budget?
For the long-distance hiker, the concept of “town stops” for resupply often feels like a necessary oasis. However, these stops can become a “Town Trap,” a significant drain on both the financial and caloric budgets of an expedition. A trip into town for a burger and a hotel room is not a “zero day”; it’s a day with a massive negative caloric ROI when you factor in the cost and time spent off-trail. Strategic foraging can be a powerful tool to extend time between these expensive resupply points.
Consider the caloric economics. A case study analysis highlighted in an article on finding caloric staples shows the trade-off. A typical “burger run” might cost $30 and consume 5 hours of travel and town time. In contrast, two hours of focused foraging for high-calorie staples like nuts, acorns, or cattail roots could yield an equivalent caloric value for free. This not only saves money but also extends on-trail autonomy by 1-2 days over the course of a long hike. The key is to target foods with high caloric density and minimal processing time.
Black Walnuts are a prime example of a high-ROI trailside food. They provide a staggering 173 calories per ounce, primarily from fat and protein, making them an ideal fuel for endurance. While they require effort to crack, the energy return is enormous compared to low-density greens. By learning to identify and utilize 2-3 of these high-value staples that are abundant along your route, you can dramatically reduce your dependency on town stops. You carry less food, save more money, and spend more time in the wilderness—a net positive in every metric that matters on a thru-hike.
Key Takeaways
- Prioritize Caloric ROI: True survival foraging is not about finding edible plants, but about finding plants that provide more calories than you spend to acquire and process them.
- Master the “Confluence of Evidence”: Never rely on a single feature for identification. Use a systematic protocol to confirm multiple characteristics before consuming any wild plant to avoid deadly mistakes.
- Understand the Full “Acquisition Cost”: The cost of a wild food includes not just the energy to dig or pick it, but also the energy for processing (like leaching tannins) and the risk of legal penalties.
Planning Expedition Logistics: How to Secure Permits for Restricted Wilderness Areas?
As you advance from opportunistic foraging to planning expeditions that rely on it, your logistical framework must evolve. Some of the most pristine and resource-rich wilderness areas are also the most heavily regulated. Assuming a general access permit includes the right to forage is a critical error. In many restricted zones, such as certain parts of National Forests or special management areas, harvesting plant materials requires a separate and specific authorization, often called a “Forest Product Permit” or “Special Use Permit.”
Securing these permits is a strategic process. When you apply, you are not merely asking for permission; you are making a case that you are a responsible and low-impact user of the land. Your application is an opportunity to demonstrate your expertise. Clearly stating your knowledge of ethical harvest principles, such as the “Rule of Thirds” (take one-third for yourself, leave one-third for wildlife, and leave one-third for plant regeneration), can significantly increase your chances of approval. This shows the land managers that you understand and respect the ecosystem.
In highly sensitive areas like Research Natural Areas, framing your request under an “educational” or “botanical study” purpose may open doors that are closed to “personal consumption” requests. Be aware that these permits are rarely free. The U.S. Forest Service, for instance, often has a minimum charge for such permits to cover administrative costs. This fee is part of the “acquisition cost” of your expedition’s food resources and must be factored into your budget. Proactive and professional communication with the local ranger district office is the single most effective tool for navigating this process successfully.
Apply this energy-first mindset to your next wilderness plan to travel farther, safer, and with greater self-reliance. By viewing every decision through the lens of caloric return on investment, you transform yourself from a simple hiker into a truly efficient and resilient woodsman.