Contrary to popular belief, achieving sharp forest photos isn’t about overpowering the darkness; it’s about mastering technical trade-offs to control it.
- Your camera’s Auto mode is designed for balanced light and will consistently fail in the high-contrast forest environment, often overexposing scenes.
- True stability for long exposures and creative freedom in composition requires a strategic choice between a tripod’s solidity and a monopod’s agility.
Recommendation: Switch to a manual or semi-manual mode (like Aperture Priority), use spot metering to read the light on a neutral subject, and deliberately underexpose to protect highlight detail.
The forest floor is a place of immense beauty and profound frustration for a photographer. You see a scene rich with texture, dappled light, and vibrant life, but your camera captures a blurry, noisy, or flat mess. The common advice—use a fast lens, raise the ISO, get a tripod—is a starting point, but it’s incomplete. It treats the forest’s low light as an enemy to be conquered with gear, leading to a constant battle against motion blur and digital grain. This approach often misses the fundamental challenge of forest photography: managing an extreme dynamic range, from blinding shafts of sunlight to deep, information-poor shadows.
But what if the key wasn’t to fight the darkness, but to understand and control it? The real path to capturing breathtaking, tack-sharp images under a dense canopy lies in shifting your mindset from a reactive gear-buyer to a proactive light-sculptor. It involves understanding *why* your camera fails and taking deliberate control of its technical functions. This is not about simply finding more light, but about precisely managing the little light that exists. It’s about learning to see the world as your camera’s sensor does—as a complex map of light values, or ‘signal,’ that must be carefully captured to minimize the electronic ‘noise’ that plagues low-light work.
This guide will deconstruct that process. We will move beyond the basics and explore the technical and artistic strategies that separate amateur snapshots from professional-grade landscape images. We will cover everything from mastering exposure and focus in cluttered environments to the crucial, often overlooked, practices of environmental scouting and gear preservation. Prepare to transform your relationship with the forest, from a place of photographic challenge to one of limitless creative potential.
This comprehensive guide details the professional workflow for achieving exceptional results in challenging forest environments. Explore the sections below to master each critical aspect of low-light photography.
Summary: Mastering the Art of Low-Light Forest Photography
- Why Your Auto-Mode Fails in the Forest and How to Fix It?
- Tripod vs Monopod: Which Is Better for Hiking Through Thick Brush?
- Order in Chaos: How to Find a Subject in a Messy Forest Scene?
- The Lens Fungus Risk: How to Store Cameras After a Week in the Jungle?
- Manual vs Auto Focus: When to Switch to Ensure Sharp Leaves?
- Why Moss Doesn’t Always Grow on the North Side of Trees?
- Binocular Stability: How to Spot Movement Without Eye Fatigue?
- Mastering Astrophotography: How to Eliminate Noise in High ISO Night Shots?
Why Your Auto-Mode Fails in the Forest and How to Fix It?
The first step to mastering forest photography is understanding why your camera’s ‘Auto’ mode is your worst enemy in this environment. Your camera’s brain is programmed with a simple goal: to evaluate a scene and expose it so the average brightness is a neutral middle gray. In a “normal” landscape, this works reasonably well. In a dark forest, however, the camera sees a vast amount of shadow and assumes the scene is underexposed. In its attempt to “correct” this, it dramatically overexposes the image. In fact, research shows that auto mode can produce images up to four stops lighter than an accurate exposure, turning rich shadows into milky grays and blowing out any bright highlights completely.
Furthermore, the default ‘Matrix’ or ‘Evaluative’ metering mode averages the light across the entire frame. This is disastrous when a bright patch of sky pierces the canopy. The meter will try to balance that tiny, brilliant spot with the vast darkness, resulting in a poor exposure for both. You lose all the detail in the shadows and the highlights. You’re not capturing the scene; you’re capturing your camera’s confusion.
The solution is to seize control. Switch to Aperture Priority (A/Av) or Manual (M) mode. More importantly, change your metering mode to Spot Metering. This transforms your meter from a wide, clumsy net into a precise laser pointer, reading light from only a tiny 1-3% of the frame. Now, you can point that spot at a crucial mid-tone—like green moss, non-reflective bark, or the forest floor—and tell the camera, “This is my middle gray.” By taking a reading from a reliable neutral tone, you establish a correct baseline exposure for the most important part of your scene. From there, you can use exposure compensation to fine-tune, often dialing down by -0.7 to -1.3 EV to retain the dark, moody atmosphere and protect precious highlight detail. This is the first and most critical step in managing the scene’s dynamic range.
Tripod vs Monopod: Which Is Better for Hiking Through Thick Brush?
Once you’ve taken control of your exposure settings, you’ll quickly find that the dark environment demands slower shutter speeds to gather enough light. This immediately brings up the question of stability. Hand-holding at 1/15th of a second is a recipe for motion blur. While the obvious answer is “use a tripod,” the dense, tangled undergrowth of a forest complicates this simple advice. The choice between a tripod and a monopod is a critical strategic trade-off between absolute stability and agile mobility.
A tripod offers unparalleled stability. It is the only tool that can lock your camera in place, completely eliminating camera shake for multi-second or even multi-minute exposures. This is non-negotiable for techniques like focus stacking, exposure blending, or capturing the silky motion of a forest stream. It allows you to use your lowest, cleanest ISO (like ISO 100) and a narrow aperture (f/11-f/16) for maximum depth of field and sharpness. However, its three legs are magnets for roots and brush, its setup is slow, and its weight and bulk can be exhausting on a long hike through difficult terrain.
A monopod, by contrast, is the champion of mobility. It’s lightweight, deploys in seconds, and provides a single, nimble point of contact with the ground. It won’t eliminate camera shake entirely, but it provides enough micro-stability to allow you to shoot 2-4 stops slower than you could hand-held. It’s perfect for the opportunistic photographer who is constantly moving, tracking wildlife, or reacting to fleeting moments of light. It doubles as a hiking pole and a tool to part brush, making it a highly efficient piece of kit for navigating the forest itself. However, you cannot walk away from it, and it’s unsuitable for the truly long exposures that unlock certain creative effects.
To make the right decision, you must analyze your intent. Are you setting out to a predetermined location to craft a single, perfect image? A tripod is your tool. Are you exploring and discovering, ready to capture moments as they appear? A monopod is your ally. The following table breaks down the core differences.
| Criterion | Tripod | Monopod |
|---|---|---|
| Deployment Speed | Slow (30-60 seconds setup) | Fast (2-5 seconds) |
| Stability for Long Exposure | Eliminates camera shake completely | Reduces shake but still requires hand support |
| Weight (Carbon Fiber) | 3-5 lbs (1.4-2.3 kg) | 0.5-1.5 lbs (0.2-0.7 kg) |
| Mobility in Thick Terrain | Limited – legs catch on brush | Excellent – single point of contact |
| Hands-Free Operation | Yes – stands independently | No – requires constant hand support |
| Multi-Tool Function | Camera support only | Hiking pole, brush separator, ground probe |
| Best Use Case | Planned compositions, static scenes | Opportunistic captures, moving subjects |
Order in Chaos: How to Find a Subject in a Messy Forest Scene?
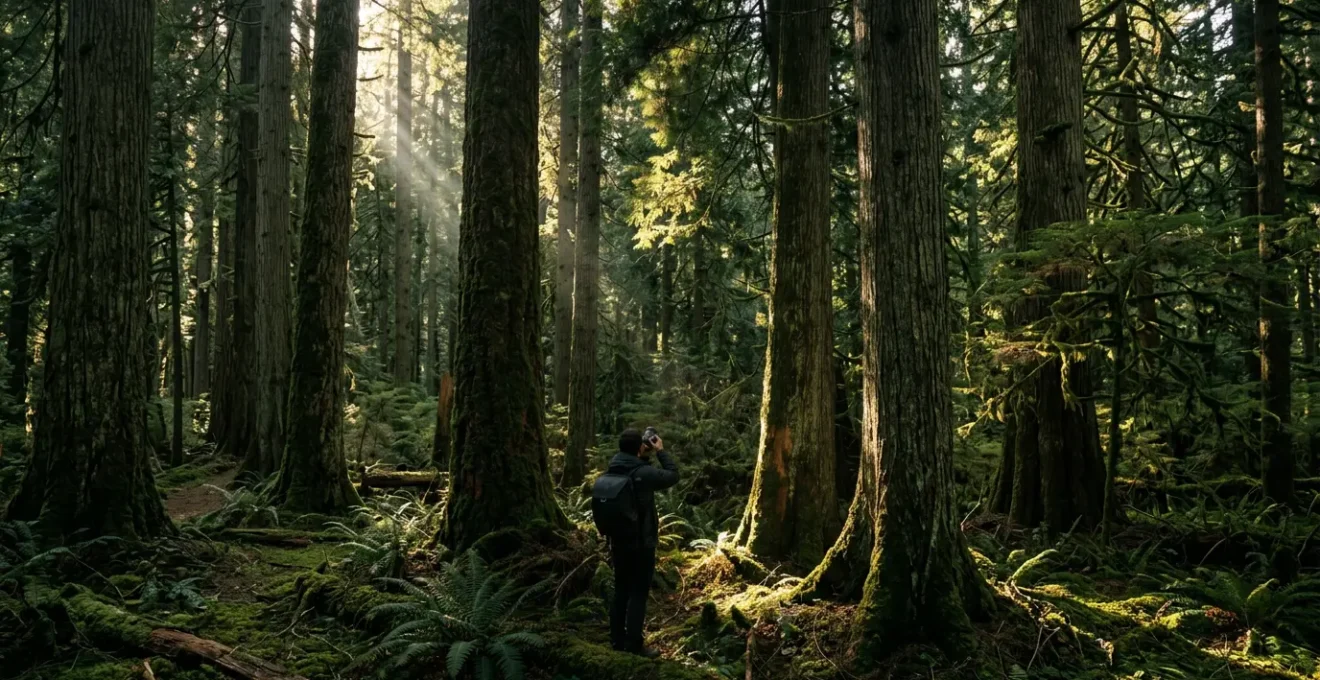
With a stable camera and control over exposure, you face the forest’s greatest artistic challenge: chaos. The forest floor is a jumble of leaves, the undergrowth a tangle of branches, and the trunks a repetitive pattern. Finding a compelling subject can feel impossible. The key is not to look for something to add, but to practice compositional subtraction—actively eliminating distractions to isolate a subject that is already there. Your most powerful tool for this is light.
Instead of looking at the forest as a whole, train your eye to look for pockets of light. A single sunbeam piercing the canopy acts as a natural spotlight, instantly separating a subject from its cluttered surroundings. This sliver of light can illuminate a patch of vibrant moss, a single interesting mushroom, or the intricate texture of a fern. By exposing for that bright spot and letting the surroundings fall into deep shadow, you create a dramatic, focused composition. The chaos doesn’t disappear; it is simply rendered irrelevant by the darkness.
As you can see in the image above, the intense visual weight of the illuminated subject draws the viewer’s eye, transforming a messy scene into a deliberate and powerful statement. Beyond light, you can use physical elements to create order. This is often achieved by creating a ‘frame within a frame,’ a classic compositional technique that uses foreground elements to guide the eye toward the main subject.
Mastering this requires practice and a conscious effort to see differently. Here are several techniques to find order in the visual noise:
- The Natural Window: Use two parallel tree trunks as vertical borders to frame a more distant subject, such as a clearing or a bend in a path.
- The Canopy Frame: Position yourself so that a low-hanging branch creates a top edge to your photo, forcing the viewer’s attention down into the scene.
- Foliage Cut-Out: Shoot through a small gap in leaves or ferns. The out-of-focus foliage creates a soft, organic border around your sharp, clear subject.
- Change Your Altitude: Get extremely low to the ground. This simplifies the background and can reveal fascinating patterns in roots, fungi, and the forest floor that are invisible from a standing height.
- Look Up: Point your camera directly up at the canopy. The chaotic tangle of branches can become a beautiful, abstract pattern of lines against the sky, simplifying the scene into a two-dimensional graphic.
The Lens Fungus Risk: How to Store Cameras After a Week in the Jungle?
Your work in the forest isn’t over when you’ve taken the shot. The humid, damp environment that creates such beautiful, moody scenes is also a mortal enemy to your camera gear. The single greatest long-term threat is lens fungus—a living organism that feeds on the microscopic coatings of your lens elements. Once it takes hold, it etches itself into the glass, permanently degrading sharpness and contrast. As noted by experts, a high-quality lens will never be the same after a fungus infestation. Preventing it is not optional; it’s an essential part of the professional workflow.
Fungus thrives in dark, stagnant, and humid conditions above 60% relative humidity. Your camera bag, after a day in a damp forest, is a perfect incubator. The solution is aggressive and immediate environmental acclimatization and dehumidification. This process starts the moment you step out of the humid outdoors and into a dry, air-conditioned space. Simply opening your bag can cause immediate condensation on and inside your cold lenses, just like a glass of iced tea on a summer day. This internal moisture is a death sentence.
To prevent this, you must follow a strict protocol. Before entering the AC, seal your camera and lenses in a Ziploc bag. Let the sealed bag sit for at least an hour to allow the gear to warm up gradually. Only then should you open it. Once out, the goal is to get the gear as dry as possible. For field work, this means using desiccants like silica gel packs. In fact, storage experts recommend maintaining a constant 40-50% relative humidity (RH) for long-term storage, a level that is impossible to achieve in a sealed camera bag without active dehumidification. These practices are not just for week-long jungle expeditions; they should be standard procedure after any shoot in a damp or humid environment.
Here is a field-expedient protocol for keeping your gear safe:
- Acclimatize: Always place gear in a sealed bag before moving from a humid to a dry/AC environment. Let it equalize in temperature for 30-60 minutes before opening.
- Use Desiccants: Place multiple color-indicating silica gel packs in your camera bag. When they turn pink (saturated), recharge them with a hairdryer or in a microwave on low power until they turn blue again. In a pinch, a clean sock filled with uncooked rice can act as a temporary desiccant.
- Aerate: During dry, sunny moments, open your camera bag for 10-15 minutes to air it out. Never expose the camera or lenses directly to the harsh sun.
- Exercise Mechanisms: In a dry environment, zoom your lenses in and out and manually focus them from end to end. This helps displace any moist air trapped inside with the drier ambient air.
Manual vs Auto Focus: When to Switch to Ensure Sharp Leaves?
Even with perfect stability and exposure, your image can be ruined by a single, simple error: missed focus. In the visually dense forest, your camera’s autofocus (AF) system can easily be tricked. It is designed to lock onto the nearest object with the highest contrast, which is often a stray leaf or twig positioned just in front of your intended subject. This results in a tack-sharp image of an unimportant foreground element, while your beautiful mushroom, flower, or distant tree remains frustratingly soft. While modern AF is powerful, there are critical moments when switching to manual focus is the only way to guarantee precision.
The primary scenario for manual focus is when shooting a subject that is partially obscured by foreground or background clutter. The AF system simply cannot read your mind and will often hunt back and forth, unable to distinguish the subject from the noise. For macro subjects, where the depth of field is measured in millimeters, autofocus is often too coarse. Relying on it is a gamble. By switching to manual focus and using your camera’s Live View screen magnified to 5x or 10x, you can critically and precisely place the plane of focus exactly where you want it, ensuring the most important part of your image is razor-sharp.
Case Study: Manual Focus for Obscured Wildlife
In a demonstration of this principle, photographer Paul Miguel shows that when trying to photograph small birds nestled among branches, his autofocus system repeatedly locked onto the foreground twigs. The solution was to switch to manual focus. By using a magnified live view, he was able to “see through” the clutter and place the focus precisely on the bird’s eye, resulting in a perfectly sharp subject isolated from its complex environment. This technique is directly applicable to any subject in a cluttered forest scene, where autofocus unreliability is a constant challenge.
However, abandoning autofocus entirely is not always the best solution. A hybrid technique called Back-Button Focus (BBF) offers the best of both worlds: the speed of autofocus with the precision and control of manual. By decoupling the autofocus activation from the shutter button, you gain immense control. You use a button on the back of the camera to focus once, and then you can take multiple pictures or recompose without the camera trying to refocus every time you press the shutter. This is a game-changer for forest photography.
Your Action Plan: Setting Up Back-Button Focus
- Assign the Button: Dive into your camera’s custom menu and reassign the autofocus function from the shutter release to a back button like ‘AF-ON’ or ‘AEL’.
- Select a Single Point: Set your focus area to the smallest single point available. This gives you maximum precision.
- Position and Lock: Place that single AF point over a high-contrast edge on your subject and press the back button once. Focus is now locked.
- Recompose and Shoot: With focus locked, you are free to recompose the shot for the best composition. The focus will not change when you press the shutter button.
- Know When to Override: If the AF still hunts in a very low-contrast or cluttered scene, you can simply stop using the back button and turn the lens’s focus ring for manual override, without changing any settings.
Why Moss Doesn’t Always Grow on the North Side of Trees?
A common piece of folklore states that moss grows on the north side of trees, providing a natural compass. While often repeated, this is a dangerous oversimplification for both navigators and photographers. Moss doesn’t care about cardinal directions; it cares about moisture and a lack of direct sunlight. In the Northern Hemisphere, the north side of a tree receives the least direct sun, making it the coolest and dampest side. So, the folklore is often true by correlation, but not by causation.
Why does this matter to a photographer? Because understanding the *real* reason for moss growth is a lesson in learning to read the subtle language of the forest’s light. If you see a tree with moss growing evenly all around its trunk, it tells you that the tree is in a location with a consistently dense canopy, receiving only soft, filtered ambient light from all directions. There is no strong, directional key light. This is a cue that you’ll be working with low-contrast, even illumination, ideal for soft portraits or detailed macro work.
Conversely, if you find a tree with a very distinct and lush moss patch on only one side, you have found the tree’s “true north” in terms of light. This tells you where the deepest, most consistent shade is. It also tells you, by extension, where the sun *is* hitting. The opposite, moss-free side is receiving the harshest light. This knowledge allows you to anticipate how the light will move and change throughout the day. You can position yourself to capture a subject in the soft, ambient light of the mossy side, while using the brighter, sunlit side as a contrasting background or a source of rim lighting later in the day. It’s a form of environmental literacy that elevates your work from just taking pictures to truly collaborating with the landscape.
Binocular Stability: How to Spot Movement Without Eye Fatigue?
A professional landscape photographer’s most underrated tool is not a lens, but a good pair of binoculars. In the vast and complex forest, your camera is too heavy and cumbersome for efficient exploration. The purpose of binoculars in this context is not just to spot distant wildlife, but for intensive compositional scouting. They allow you to scan the landscape and “zoom in” on potential compositions from a distance, saving immense time and physical energy.
However, just like with a camera, stability is key. Holding binoculars for extended periods leads to arm shake and eye fatigue, making it difficult to study details. To use them effectively, you must stabilize them. The simplest method is to brace your body against a solid tree trunk, tucking your elbows firmly against your chest to create a stable “human tripod.” This simple act dramatically reduces the fine tremors that blur the view. For even greater stability, especially with higher-magnification binoculars (10x and above), consider a lightweight tripod adapter. Many binoculars have a threaded socket for this purpose, allowing you to mount them on your monopod or tripod for a perfectly steady view.
With a stable view, you can begin to work. Scan the distant hillsides for interesting groupings of trees. Look for the glint of a hidden waterfall that might be worth hiking to. Study the way light is falling on a particular ridge, trying to identify leading lines or ‘S’ curves that aren’t apparent to the naked eye. This scouting process allows you to mentally “test” dozens of compositions without taking a single step. You can identify potential shots, dismiss dead ends, and create a mental shot list before you ever shoulder your heavy camera pack. It’s a workflow that prioritizes efficiency and intention, ensuring that when you do set up your camera, it’s for a shot that you already know has strong potential.
Key Takeaways
- Take control from Auto mode; use Spot Metering and Exposure Compensation to manage the forest’s extreme dynamic range.
- Choose your support strategically: a tripod for planned, static compositions and a monopod for agile, opportunistic shooting.
- Master focus by using magnified Live View for manual precision or Back-Button Focus for a hybrid of speed and control.
Mastering Astrophotography: How to Eliminate Noise in High ISO Night Shots?
The ultimate frontier of low-light photography is the night sky. While astrophotography might seem separate from forest work, the core challenge is identical: maximizing a very weak “signal” (starlight) while minimizing “noise” (digital grain from high ISOs). The advanced techniques used to create clean astro images are directly applicable to the darkest forest interiors, representing the pinnacle of signal-to-noise ratio (SNR) management.
The primary enemy at high ISOs is noise, which appears in two forms: luminance (graininess) and chrominance (ugly color splotches). Simply raising the ISO to get a brighter image amplifies this noise exponentially. Two powerful professional techniques exist to combat this: Image Stacking and Exposing to the Right (ETTR). Image Stacking involves taking multiple identical shots of the same scene and then blending them together in software. Because the light from the subject (the signal) is constant in every frame, but the digital noise is random, the software can average out the noise, leaving a single, incredibly clean and detailed final image. This same method used to capture noise-free nebulae can be used to create a noise-free image of a mossy log in near-darkness.
The second technique, Expose to the Right (ETTR), is a counter-intuitive method of exposure. Camera sensors capture the most detail and the least noise in the brightest parts of an image. Noise lives in the shadows. When you take a dark photo and brighten it in post-production, you are amplifying the noise that was lurking in those shadows. ETTR flips this on its head. As explained by imaging professionals, the idea is to intentionally overexpose your image as much as possible without clipping the highlights. The image will look too bright on your camera screen, but the sensor has captured a huge amount of clean data. In post-production, you simply pull the exposure slider down to restore the natural brightness. The result is shadows that are remarkably clean and free of noise, because they were captured as bright tones to begin with.
Here is the workflow for the ETTR technique:
- Activate Your Histogram: This is your most important tool. Display the live histogram on your camera’s screen.
- Compose and Expose: Frame your shot and increase your exposure (via shutter speed or ISO) while watching the histogram.
- Push to the Right: Keep increasing the exposure until the graph on your histogram gets as close as possible to the right edge *without touching it*. If it touches, your highlights are clipped and lost forever.
- Capture the “Bright” Shot: Take the picture. It will look washed out, but the data is pristine.
- Correct in Post: In your editing software, simply lower the exposure to your desired brightness. The resulting image will have significantly better shadow detail and less noise than a traditionally exposed shot.
By moving beyond the simple automated functions of your camera and embracing these technical and artistic principles, you transform the forest from an obstacle into a creative partner. The path to sharp, compelling images under the canopy is paved not with more expensive gear, but with deeper understanding. Start practicing these techniques today to begin capturing the forest’s true, breathtaking beauty.