In summary:
- The gym’s controlled environment teaches habits that are dangerous on real rock.
- Outdoor climbing safety is not a list of rules but a mindset of “Redundancy and Respect” for an unpredictable environment.
- Mastering dynamic belaying, secure anchor cleaning, and non-verbal communication are non-negotiable skills.
- Always wear a helmet, as rockfall is a significant and unpredictable risk for both climbers and belayers.
- Learning to read natural rock and use advanced techniques like stemming is crucial for efficiency and safety.
The feeling of clipping the chains at the top of a gym route is a familiar victory. You’ve solved the puzzle, pushed your limits, and are now rewarded with a safe, controlled lower back to the padded floor. But staring up at a real rock face, the rules change. The holds aren’t brightly colored, the top isn’t a pre-set anchor, and the ground below is decidedly not padded. For any gym climber, this transition is both thrilling and intimidating.
Many will tell you that outdoor climbing is simply “different.” They’ll mention you need to learn new knots or be mindful of the weather. While true, this advice misses the fundamental shift required. The real challenge isn’t just learning new skills; it’s unlearning the subconscious habits and false sense of security the gym instills. The transition from gym to crag is about trading a predictable environment for an unpredictable one, and this requires a new mindset rooted in redundancy and respect.
This guide moves beyond generic tips. We will deconstruct the critical differences you’ll face and provide the systems needed to manage them. Instead of a simple checklist, you will learn the ‘why’ behind each safety protocol, transforming fear of the unknown into a confident, proactive approach to risk. We will explore how to adapt your belay, secure yourself at the top, manage communication when you can’t be heard, and read the rock when there’s no tape to guide you. This is your blueprint for becoming a competent and safe outdoor climber.
This comprehensive guide breaks down the essential skills and mental adjustments needed for a safe transition. The following sections will walk you through each critical aspect of moving your climbing from the gym to the great outdoors.
Summary: Your Guide to Climbing Outdoors
- Dynamic vs Static Belay: Why Gym Habits Can Be Dangerous on Real Rock?
- The Mussy Hook Mistake: How to Thread the Anchor Without Dropping the Rope?
- Rockfall Risk: Why You Wear a Helmet Even When Belaying on the Ground?
- Chalk Marks vs Natural Holds: How to Find the Route When It’s Not Color-Coded?
- Rope Tugs vs Walkie Talkies: How to Communicate When You Can’t Hear “Take”?
- Toe Space vs Precision: How Tight Should an Approach Shoe Be?
- Stemming and Bridging: How to Move Through Canyons Without Exhausting Your Core?
- Climbing Limestone Crags: How to Grip Polished Holds Without Slipping?
Dynamic vs Static Belay: Why Gym Habits Can Be Dangerous on Real Rock?
In the gym, falls are short, clean, and predictable. Your belayer stands in one spot and provides a “hard catch,” stopping you abruptly. This is a habit that can become dangerous outside. Outdoor routes are longer, often wander, and have more rope in the system. A static, gym-style catch on a real lead fall can generate immense force, potentially injuring the climber or causing gear to fail. It’s the difference between hitting a safety net and a concrete floor. The solution is adopting a dynamic belay, a technique designed to absorb and dissipate these forces.
The principle of a dynamic belay, or “soft catch,” is to add a small amount of movement to the system at the moment of a fall. As climbing guide Angus Kille explains, this changes the physics of the event. A soft catch “dampens the force in a fall, so that it feels more like falling on a bungee cord than falling on a steel cable.” This not only protects the climber from a jarring stop but also reduces the peak load on the rope and the last piece of protection. It is a fundamental shift from simply holding the rope to actively managing the forces of a fall—a core tenet of the outdoor risk mindset.
To give a soft catch, the belayer introduces a small amount of slack or movement into the system by taking a small step or a slight jump as the rope comes taut. This requires constant attention and readiness. The belayer must anticipate the fall, absorb the energy with their body, and provide just enough movement to soften the impact without allowing the climber to fall too far and hit a ledge or the ground. Mastering this technique is a non-negotiable skill for any aspiring outdoor leader.
This isn’t just a “nice to have” skill; it’s a critical safety system that demonstrates respect for the more complex and powerful forces at play on real rock.
The Mussy Hook Mistake: How to Thread the Anchor Without Dropping the Rope?
Reaching the top of your first outdoor route is a moment of triumph, quickly followed by a daunting question: “Now what?” Unlike gym anchors with pre-installed hardware for lowering, sport climbing anchors require you to “clean” them—a process of re-threading the rope so you can be lowered without leaving expensive gear behind. This is one of the most dangerous moments for a new outdoor climber. A common error, often involving a “Mussy Hook” or other improvised methods, is to briefly unclip from the rope. This introduces a single point of failure where a simple mistake can be fatal.
The guiding principle here is system redundancy. You must always be connected to the anchor by at least two independent points of contact, and you must never, ever be detached from the climbing rope. An analysis of accidents by the American Alpine Club established core principles for safe anchor cleaning: minimize complexity to reduce errors and, most importantly, eliminate any transition where the climber is not connected to the rope. Their recommended methods ensure the climber stays on belay throughout the entire process, preventing falls caused by miscommunication or procedural errors during the switch to a rappel.
The correct procedure involves clipping directly to the anchor with two quickdraws or a dedicated personal anchor system (PAS). Only then, while still securely attached and on belay, should you pull up a bight of rope, thread it through the anchor rings or chains, and tie a figure-eight knot back to your harness. Once this new loop is secured and double-checked, and you have confirmed your belayer has you, you can untie your original knot and ask your belayer to take in the slack. This methodical, redundant process eliminates the risk of being dropped or dropping the rope itself.
This isn’t about speed; it’s about a deliberate, foolproof sequence that respects the very real consequences of a mistake made 100 feet off the ground.
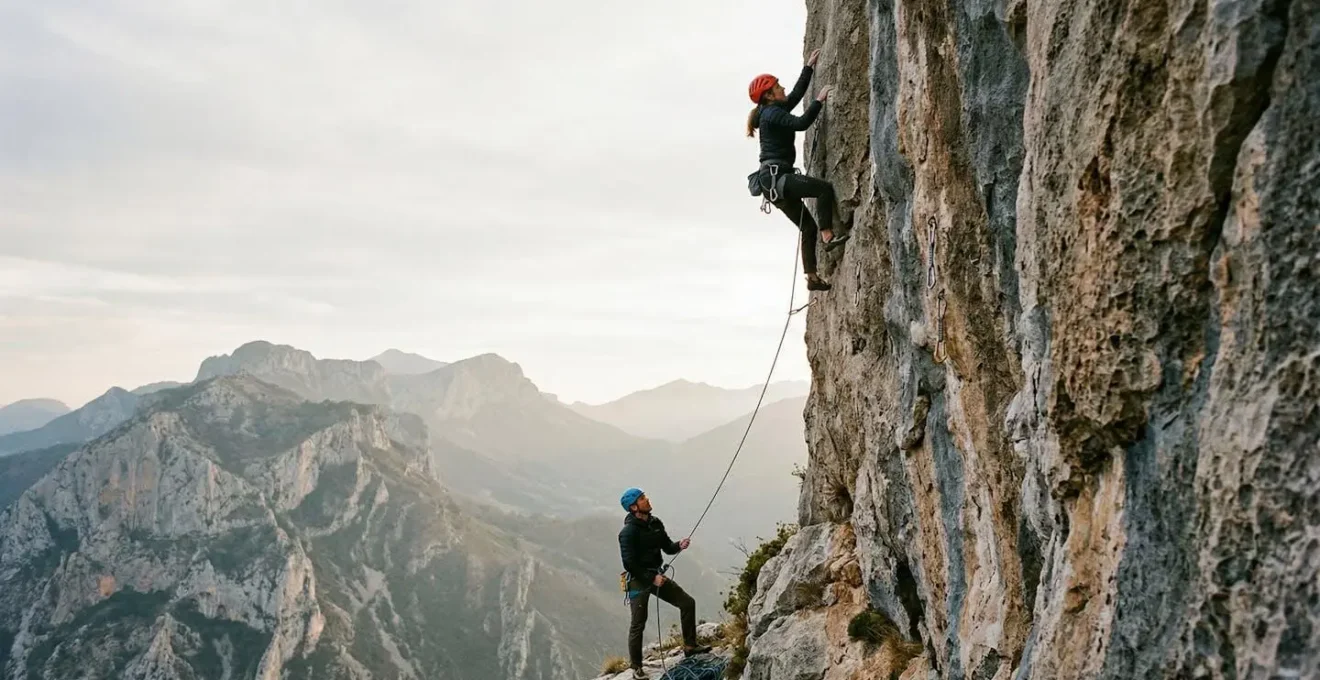
Rockfall Risk: Why You Wear a Helmet Even When Belaying on the Ground?
In a climbing gym, the only thing that might fall on your head is a stray water bottle. This creates a dangerous complacency. Outdoors, the rock is a living, changing environment. Loose rocks, dislodged by the climber, the rope, or even the wind, are a constant and unpredictable threat. Many new climbers think a helmet is only for the person climbing, but this is a critical misunderstanding of the risk. The belayer on the ground is often in an even more vulnerable position, unable to move quickly and directly in the line of fire.
The statistics are sobering. According to the American Alpine Club, rockfall is the second leading cause of fatalities in the U.S. climbing community. It’s not a theoretical danger; it’s a primary hazard of the sport. While a helmet cannot prevent all injuries, its effectiveness is undeniable. Research shows a reduction of approximately 30-50% in head injury risk with helmet use in climbing accidents. Wearing one is a simple, effective piece of personal protective equipment that directly addresses a major environmental variable you cannot otherwise control.
Case Study: The Belayer’s Helmet
The American Alpine Club analyzed two incidents where belayers were struck by climber-caused rockfall. In both cases, the belayers were using assisted-braking devices, which likely prevented the climbers from hitting the ground after their belayers were incapacitated. In one incident, the belayer had fortunately borrowed the climber’s helmet and was protected from serious injury. The other incident served as a stark reminder of the critical importance of helmets, even for those standing on the ground in seemingly safe sport climbing areas.
Your helmet protects you not only from falling rock but also from swinging into the wall during a fall or, as a belayer, being pulled upward into the first bolt. It is an essential part of your safety system. The question isn’t whether you think a rock will fall, but what will happen if it does. A helmet is the definitive answer.
Forgoing a helmet is not a calculated risk; it’s a blind gamble against gravity, and the house always wins.
Chalk Marks vs Natural Holds: How to Find the Route When It’s Not Color-Coded?
One of the biggest mental hurdles in transitioning outdoors is route-finding. Gyms provide a clear, color-coded path from start to finish. On real rock, the route is an invisible line on a complex, three-dimensional canvas. You might see chalk marks, but are they for your hands or your feet? Are they from a taller climber who skipped the hold you desperately need? Relying solely on chalk is a recipe for getting lost and exhausted.
Real rock offers an unlimited amount of hand and foot holds that aren’t obvious like the brightly colored holds at indoor gyms. Beginners find it difficult to make smaller movements and to use intermediate holds to gain more obvious holds higher up.
– Daniel Coeur, Gym to Crag: How to Transition to Outdoor Climbing
Learning to read natural rock is a skill of observation and visualization. It involves looking beyond the obvious and seeing the subtle features—the small edges, the sidepulls, the texture changes—that form the path of least resistance. This process begins on the ground, long before you tie in. It requires a different way of seeing, one that actively seeks possibilities rather than following a prescribed sequence. Your goal is to build a mental map of the climb, identifying key holds, potential rest stances, and crux sequences.
To effectively read a route on natural rock, you should:
- View from multiple angles: Step back and walk from side to side. This can reveal hidden holds like undercuts or sidepulls that are invisible from directly below.
- Distinguish hand chalk from boot rubber: Chalk often indicates handholds, while black marks from shoe rubber can reveal key footholds. Be wary, though, as “false chalk” can lead you astray.
- Identify reference points: Look for unique features like a dark streak in the rock or a small bush that can guide you to a “blind” hold you can’t see from below.
- Mime the movements: From the ground, go through the hand sequence in your mind, visualizing your body position and the direction of pull for each hold.
This skill is fundamental to outdoor climbing. It’s about becoming a partner with the rock, understanding its language, and finding your way through its complex terrain.
Rope Tugs vs Walkie Talkies: How to Communicate When You Can’t Hear “Take”?
In the gym, your belayer is ten feet away. A simple “Take!” or “Watch me!” is all that’s needed. At a windy, 100-foot-tall crag with multiple other climbing parties, verbal communication becomes unreliable and even dangerous. A misunderstood command can have catastrophic consequences, and reports indicate an increasing frequency of fatal accidents resulting directly from miscommunication at the anchor. Yelling louder is not a strategy. The solution is to establish a clear, pre-agreed, non-verbal communication protocol before the climber leaves the ground.
This is where proactive communication replaces reactive shouting. Whether you use a system of rope tugs or a pair of walkie-talkies, the plan must be unambiguous and confirmed by both partners. Relying on assumptions is a gamble you can’t afford to take. A simple rope tug system might involve one tug for “slack,” two for “take,” and three sharp tugs for “off belay.” This contract, established in the quiet safety of the ground, becomes a lifeline when wind and distance make voices useless. Using your partner’s name with every command is also crucial at a crowded crag to ensure the right person is responding.
Even with a system, confirming critical commands is paramount. The most crucial check is before the climber unclips from the anchors to be lowered. After threading the rope and tying back in, the climber should weight the rope system *while still secured to their personal anchor*. This physical test confirms, without a doubt, that the belayer has them and the system is sound. It’s the ultimate act of system redundancy, removing any chance of a deadly misunderstanding.
Your Pre-Climb Communication Checklist
- Establish the Contract: Before climbing, agree on a clear rope tug system (e.g., 1 tug = slack, 2 = take, 3 = off belay) for when verbal calls are impossible.
- Discuss the Plan: Clarify the anchor cleaning method (lower vs. rappel) with your belayer on the ground to prevent confusion at the top.
- Use Names: At crowded crags, begin every command with your partner’s name to avoid confusion with other climbing teams.
- Confirm Critical Commands: The belayer must repeat back commands like “Off Belay.” When using radios, say “over” to signal the end of a transmission.
- Weight-Test the System: Before unclipping from the anchor, always weight the rope to physically confirm you are on belay and the communication was successful.
This is not about being overly cautious; it’s about building a professional and failsafe communication system that respects the hazardous potential of a simple “I thought you said…”
Toe Space vs Precision: How Tight Should an Approach Shoe Be?
Your journey to the crag often begins with a hike, and the footwear you choose is a critical but often overlooked piece of gear. An approach shoe is a hybrid, designed to handle both trail hiking and simple rock climbing or “scrambling.” This dual purpose creates a fundamental conflict in fitting: the comfort of a hiking boot versus the precision of a climbing shoe. A loose, comfortable fit is great for the walk-in but can feel sloppy and insecure on a technical, exposed scramble to the base of the climb. A tight, precise fit is excellent for edging on rock but can be painful on a long descent.
The key is to strike a balance, but as a climber, you must prioritize precision and safety over comfort. Your approach shoes should be sized more like a climbing shoe than a hiking boot. Your toes should come to the very end of the shoe, either flat or with a very slight curl, but without painful pressure points. There should be minimal to no empty space at the front. This “performance fit” ensures that when you stand on a small rock edge, the shoe doesn’t roll or flex, giving you a secure and trustworthy platform.
To manage the comfort aspect, look for a few key features. A high-quality lacing system that extends far down toward the toe allows you to customize the fit. You can keep the laces looser for the hike and then cinch them down tightly for technical sections. Additionally, a well-designed heel cup should lock your foot in place, preventing blisters during the hike. Breaking in your shoes at home before a big day is also essential. Ultimately, a little discomfort on the trail is a small price to pay for security when the terrain gets steep and a slip could have serious consequences.
Remember, the purpose of an approach shoe is to get you to the base of your climb safely, and that safety is built on a foundation of precise, reliable footwork.
Stemming and Bridging: How to Move Through Canyons Without Exhausting Your Core?
Gym walls are typically flat planes, training you to pull yourself up with your arms and push with your legs. But real rock is a three-dimensional world of corners, dihedrals, and opposing features. A purely linear, pull-up approach will quickly exhaust your arms. This is where techniques like stemming and bridging become essential. These are not just fancy moves; they are fundamental principles of efficient movement that use body tension and opposition to conserve energy.
As noted in many transition guides, “Gyms, with their often-flat walls, don’t prepare climbers for the 3D nature of real rock.” Stemming is the art of using opposing pressure. Imagine you are in a narrow corridor or a corner (a “dihedral” in climbing terms). Instead of trying to climb one wall, you place your feet on the opposing walls and push outward. This opposition creates a stable, balanced position that takes a significant amount of weight off your arms. It can be a powerful move to gain height or, just as importantly, a surprisingly good “active rest” position to recover and plan your next moves.
Bridging is a similar concept applied to wider gaps. It involves spanning the distance between two points of contact, using your body as a “bridge” to maintain tension and stability. Both techniques rely heavily on core strength and precise body positioning. They transform climbing from a simple vertical ladder into a dynamic puzzle of pressure and counter-pressure. Mastering stemming allows you to flow through complex terrain that would otherwise feel strenuous and desperate, saving your precious arm strength for the true cruxes of the climb.
This is the essence of respecting the rock’s features—not fighting them with brute force, but using their geometry to your advantage.
Key Takeaways
- Mindset Shift is Primary: Success and safety depend on shifting from a gym’s rule-based environment to a crag’s risk-aware mindset based on redundancy and respect.
- Systems, Not Single Actions: Every safety procedure, from belaying to anchor cleaning and communication, must be treated as a redundant system, not a single action.
- The Environment is an Active Partner: Unlike the static gym, the outdoor environment presents active risks like rockfall and communication barriers that must be proactively managed.
Climbing Limestone Crags: How to Grip Polished Holds Without Slipping?
Not all rock is created equal. Climbing on the grippy, textured granite of Yosemite is a world away from climbing on the often-polished limestone found in many European and American sport climbing areas. Limestone is a sedimentary rock that is relatively soft and water-soluble. Over time, the combination of weather and the passage of thousands of climbers’ hands and feet can polish the holds to a slick, glassy finish. For a climber used to the reliable texture of plastic gym holds, encountering polished limestone can be a frustrating and unnerving experience.
The secret to climbing on polished rock is not about gripping harder; it’s about shifting your entire technique. Your trust must move from your fingers to your feet and your core. On slick holds, you must rely on precise footwork and body tension. Focus on keeping your weight directly over your feet, pressing them onto the holds with conviction. Use the stickiest part of your climbing shoe rubber and look for any tiny dimples or edges that might offer a fraction more grip. Trying to “campus” or pull hard with your arms on polished slopers is a losing battle.
Body position is also paramount. Keep your hips close to the wall to maximize the pressure on your footholds. Engage your core to create body tension, which helps you “stick” to the wall rather than scraping down it. The conditions also play a huge role. Polished limestone can feel impossible in warm, humid weather but surprisingly grippy on a cool, dry day. Learning to climb on this type of rock is an exercise in subtlety and control. It teaches you to respect the character of the rock and adapt your style, moving with finesse and balance rather than relying on brute strength.
Now that you understand the fundamental mindset and the specific skills required, the next step is to get out there and practice them. Start on easy, well-traveled routes with an experienced mentor or a certified guide to build your confidence and solidify these life-saving habits.