Contrary to popular belief, your physical fitness has almost no bearing on your susceptibility to altitude sickness; your genetics and ascent rate are what truly matter.
- High-altitude survival is a science of managing hypoxia, not a test of endurance. Key factors are genetically predetermined.
- Protocols for hydration, pacing (“climb high, sleep low”), and medication are not suggestions, but critical components of a successful ascent profile.
Recommendation: Stop training like a marathon runner and start preparing like a physiologist. Master the rules of ascent, learn to diagnose the deadly signs of HACE/HAPE, and build an itinerary that respects your body’s adaptation limits.
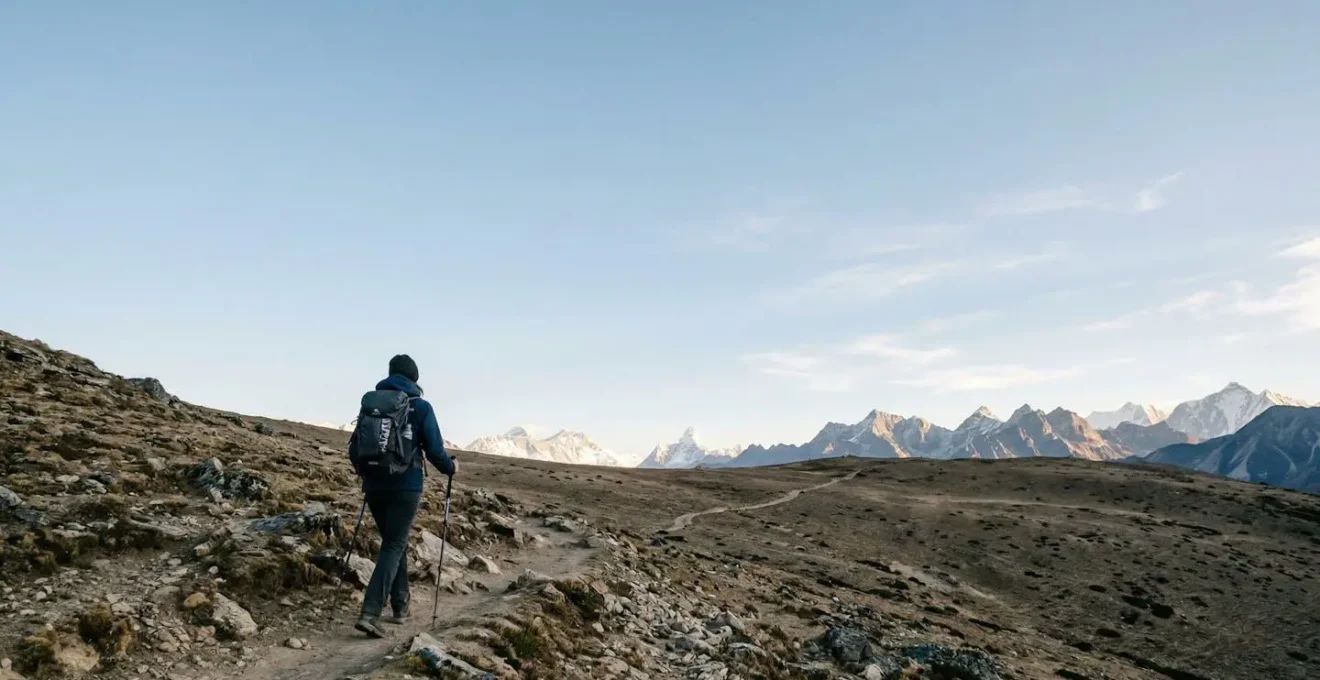
The dream of trekking through the Himalayas or Andes, standing on a high-altitude plateau with the world at your feet, carries a potent allure. But for every story of triumph, there’s a whispered fear: the insidious headache, the nausea, the fatigue that can escalate into a life-threatening emergency. This is the shadow of Acute Mountain Sickness (AMS), a condition that can ruin the most meticulously planned expedition. The internet is filled with generic advice: “go up slowly,” “stay hydrated,” “get fit.” While not incorrect, this advice is dangerously incomplete. It fails to address the fundamental physiological principles at play.
Many trekkers believe that their rigorous sea-level training—running marathons, cycling for hours, lifting weights—will grant them immunity. This is a critical, and common, physiological misconception. The reality is that your body’s response to the low-oxygen environment of high altitude is a complex process governed more by your genetic makeup and the precise rate of your ascent than by the power in your legs or the capacity of your lungs at sea level. True preparation for high-altitude trekking is less about pushing your physical limits and more about understanding and respecting your physiological ones.
This guide moves beyond the platitudes. It is not a list of tips; it is a medical and strategic framework for managing hypoxic stress. We will dissect the science behind why being fit doesn’t protect you, provide a formula for calculating your precise hydration needs, and teach you the non-negotiable differences between a simple headache and the deadly cerebral or pulmonary edema. We will analyze the strategic choice between medication and natural acclimatization based on your ascent profile and teach you the techniques to pace yourself for multi-day efforts. This is your medical briefing for a safe and successful journey to the top of the world.
To navigate this critical information effectively, this article is structured to build your knowledge layer by layer, from foundational misunderstandings to life-saving diagnostics and advanced pacing strategies.
Table of Contents: A Medical Guide to Preventing AMS Above 3,000 Meters
- Why Being Fit Doesn’t Guarantee You Won’t Get Altitude Sickness?
- How to Calculate Your Water Intake When Dry Air Sucks Moisture from You?
- HACE vs HAPE: The Differences Every High-Altitude Trekker Must Memorize
- Diamox or Natural Acclimatization: Which Strategy Fits Your Itinerary?
- The “Rest Step” Technique: How to Climb All Day Without Running Out of Breath
- Calorie Deficit: How Much Weight Will You Lose on a 14-Day Trek?
- Legs or Lungs: What Should You Prioritize for Elevation Gain?
- Trekking High Circuits: How to Pace Your Daily Ascent to Avoid Burnout?
Why Being Fit Doesn’t Guarantee You Won’t Get Altitude Sickness?
This is the most critical and counter-intuitive lesson for any high-altitude aspirant: your marathon time or gym performance has virtually no correlation with your ability to acclimatize. As a guide, I’ve seen elite athletes grounded by severe AMS while their less-fit companions trek on comfortably. The reason lies in genetics, not conditioning. The belief that fitness is a shield is a dangerous physiological misconception that can lead to overconfidence and a dangerously rapid ascent. The primary determinants of AMS are the altitude gained, the rate of ascent, and your individual genetic predisposition to hypoxia.
As Black Sheep Adventures points out in their comprehensive guide, “Physical fitness does not prevent altitude sickness. Research consistently shows that AMS susceptibility is primarily determined by the rate of ascent, the altitude reached, and individual genetic physiology — not by how fit you are.” This is not opinion; it’s a conclusion backed by decades of high-altitude medical research. Your cardiovascular system might be efficient at sea level, but acclimatization is about the body’s ability to produce more red blood cells, adjust blood pH, and manage fluid shifts—a process that happens on a fixed, genetically-timed schedule.
Case Study: The EPAS1 Gene in Tibetan Populations
The ultimate proof of the genetic basis for altitude adaptation comes from studying populations who have lived at high altitude for millennia. An in-depth study on Tibetan populations revealed that the EPAS1 gene, which regulates the body’s response to low oxygen, has undergone strong positive selection. Variants of this gene common in Tibetans actually down-regulate the production of red blood cells, protecting them from the dangerous blood thickening (polycythemia) that can affect lowlanders at altitude. This elegant genetic solution demonstrates that tolerance to hypoxia is an inherited trait, not an earned one, explaining why some individuals acclimatize far better than others, regardless of their physical fitness.
Therefore, the first step in your preparation is one of humility. You must discard the notion that your fitness makes you invincible. Your training is valuable for endurance and injury prevention on the trail, but it does not buy you a faster ticket to the summit. Your pacing strategy must be dictated by the universal rules of acclimatization, not by how strong your legs feel.
How to Calculate Your Water Intake When Dry Air Sucks Moisture from You?
At high altitude, “drink plenty of water” is advice so common it’s almost meaningless. The real question is: how much is “plenty”? The answer is significantly more than you think, and the reason is twofold. First, the air at altitude is extremely dry. Every breath you exhale is saturated with moisture, leading to a constant, significant fluid loss through respiration—a process you don’t even feel. Second, the physical exertion of trekking increases fluid loss through sweat. Together, these factors create a perfect storm for dehydration, which can mimic and exacerbate the symptoms of AMS, making a bad situation worse.
A more systematic approach than simply “drinking when thirsty” (thirst is a delayed indicator of dehydration) is necessary. You should aim to consume between 4 to 5 liters of fluid per day. A simple, yet effective, real-time indicator of your hydration status is your urine output and color. You should be urinating frequently, and the color should be a pale, straw-like yellow. Dark yellow or infrequent urination is a clear sign that you need to increase your fluid intake immediately. However, it’s also crucial to balance plain water with electrolyte sources (powders, tablets, or salty snacks) to prevent hyponatremia, a dangerous condition caused by diluting the body’s sodium levels through over-hydration with plain water.
To put this into a more structured plan, you can follow a simple formula based on the triple-loss model:
- Baseline Intake: Start with your normal sea-level requirement, approximately 2 liters per day.
- Respiratory Loss: Add an additional 1-2 liters to compensate for moisture lost through breathing the cold, dry air.
- Exertion Loss: Add another 0.5-1 liter for every hour of active, strenuous trekking.
This method helps you move from a vague goal to a quantifiable daily target, which is essential for maintaining performance and safety in a hypoxic environment.
HACE vs HAPE: The Differences Every High-Altitude Trekker Must Memorize
This is the most serious section of this guide. While Acute Mountain Sickness (AMS) is uncomfortable, its severe forms—High-Altitude Cerebral Edema (HACE) and High-Altitude Pulmonary Edema (HAPE)—are rapidly fatal if not recognized and treated. This is not academic knowledge; it is a life-saving diagnostic imperative. You, and every member of your trekking party, must be able to distinguish between them. HACE is swelling of the brain. HAPE is fluid filling the lungs. Both are medical emergencies requiring immediate descent.
The key difference is the primary organ affected. HACE is a neurological problem, so its cardinal symptom is a change in mental status. The most reliable field test is for ataxia—the loss of coordination. If a trekker with a severe headache cannot walk a straight heel-to-toe line without stumbling, you must assume they have HACE and descend immediately. Other signs include confusion, irrational behavior, drowsiness, and slurred speech. HAPE, on the other hand, is a respiratory problem. Its cardinal symptom is extreme breathlessness *at rest*. A trekker struggling to breathe while sitting down, experiencing a tight chest, or developing a wet, gurgling cough (sometimes with pink, frothy sputum) is a HAPE emergency. The incidence of HAPE can be as high as 6% for trekkers ascending more than 600m per day, making it a very real threat.
The following table is not just for reading; it should be memorized. In a high-stress situation at 4,500 meters, you will not have time to look this up. These are the critical diagnostic differences that could save a life.
| Criterion | HACE (Brain Edema) | HAPE (Lung Edema) |
|---|---|---|
| Primary Organ | Brain/Neurological | Lungs/Respiratory |
| Cardinal Symptoms | Altered mental status, ataxia, confusion, drowsiness | Dyspnea at rest, chest tightness, wet cough |
| Field Test | Heel-to-toe walk test for ataxia (loss of coordination) | Listen for gurgling/wet breath sounds, check for breathlessness at rest |
| Visual Signs | Confusion, unusual behavior, slurred speech | Cyanosis (blue lips/fingertips), pink frothy sputum |
| Minimum Altitude | Uncommon below 3,500m (11,500 ft) | Can occur as low as 2,400m (8,000 ft) |
| Emergency Action | Descend immediately 500-1,000m + Dexamethasone 8mg | Descend immediately 1,000m + Oxygen + Nifedipine if needed |
| Memory Aid | Confusion & Stumbling = Brain Problem → DESCEND NOW | Wet Cough & Breathless at Rest = Lung Problem → DESCEND NOW |
Do not attempt to “tough it out” or hope these symptoms will improve with rest at the same altitude. They will not. Both HACE and HAPE are a definitive signal that the body’s acclimatization process has failed catastrophically. The only cure is a rapid and significant descent of at least 500-1,000 meters.
Diamox or Natural Acclimatization: Which Strategy Fits Your Itinerary?
The decision to use acetazolamide (brand name Diamox) for AMS prophylaxis is a strategic one, based entirely on your planned ascent profile. It is not a sign of weakness, nor is it a magic bullet that allows you to ignore the rules of acclimatization. Diamox works by stimulating breathing and helping to speed up the acclimatization process. The question is not “Should I take it?” but rather, “Does my itinerary’s risk level warrant its use?” The risk is highest on itineraries with a forced rapid ascent; studies show that AMS incidence can approach 50% for people flying directly to destinations like Cusco or Lhasa (both above 3,400m).
For trekkers with the luxury of time, following a slow, gradual ascent profile is always the preferred method. This allows the body to acclimatize naturally. In this scenario, Diamox might be carried for emergency treatment rather than taken prophylactically. However, for many trekkers on a fixed schedule or those with a previous history of AMS, prophylactic use is a highly effective way to reduce the risk and severity of symptoms. As the Centers for Disease Control and Prevention (CDC) state, “An effective dose for prophylaxis that minimizes the common side effects of paresthesia is 125 mg every 12 hours, beginning the day before ascent and continuing the first two days at altitude, and longer if ascent continues.”
To make an informed decision, you must honestly assess your itinerary against established risk factors. The following decision matrix from the CDC provides a clear, evidence-based framework for this choice.
| Ascent Scenario | Risk Level | Recommended Strategy | Acetazolamide Dosage |
|---|---|---|---|
| Gradual ascent, experienced trekker | Low Risk | Natural acclimatization; carry acetazolamide for treatment if needed | Not indicated for prophylaxis |
| Moderate ascent rate, some altitude experience | Medium Risk | Consider acetazolamide prophylaxis; natural acclimatization as foundation | 125mg every 12 hours |
| Forced rapid ascent (flying to Cusco, La Paz, Lhasa) | High Risk | Strongly encourage acetazolamide prophylaxis + dexamethasone for emergency | 125mg every 12 hours; start 1 day before ascent |
| Previous history of AMS | High Risk | Acetazolamide prophylaxis essential | 125mg every 12 hours |
| Everest Base Camp or similar itinerary | Medium-High Risk | Combined approach: gradual ascent + acetazolamide for first 2-4 days | 125mg every 12 hours during crucial acclimatization phase |
Remember to consult with your physician before making any decision. Diamox is a sulfa drug and can cause side effects, the most common being tingling in the fingers and toes (paresthesia) and increased urination. It’s crucial to test your tolerance for the medication before you leave for your trip.
The “Rest Step” Technique: How to Climb All Day Without Running Out of Breath
At high altitude, your enemy is not the distance, but the relentless, oxygen-starved effort of moving uphill. The “Rest Step” is a fundamental mountaineering technique designed to manage this effort. It transforms walking from a muscular activity into a process of controlled, efficient progress. The core principle is simple: during each step, you briefly transfer your entire body weight onto your downhill leg, locking the knee. For that split second, your skeleton, not your muscles, is supporting your weight, allowing your muscles a micro-rest. By linking thousands of these micro-rests together, you can maintain a slow, steady pace all day long without exhausting yourself.
The Rest Step is most effective when synchronized with another crucial technique: Pressure Breathing. This involves a forceful exhalation through pursed lips, like blowing out a candle. This action increases the pressure in your lungs, helping to force more oxygen across the alveolar membrane into your bloodstream. A common rhythm is to take a step, lock your back leg, and perform one forceful pressure breath. Inhale through your nose as you swing the other leg forward. This creates a sustainable, almost meditative rhythm: Step, Lock, Breathe. Step, Lock, Breathe. This deliberate pacing feels incredibly slow at first, but it is the key to conserving energy and avoiding the boom-bust cycle of rushing, getting breathless, and needing long stops to recover.
Your Action Plan: Mastering the Rest Step & Pressure Breathing
- Isolate the Movement: Practice at home. Take one slow step forward. As your front foot lands, consciously shift all your weight onto your straight, locked back leg. Feel the rest.
- Incorporate the Breath: During the “locked leg” rest phase, perform a forceful exhale through pursed lips (“Pressure Breath”). Make a “psshh” sound.
- Synchronize the Rhythm: Link the two. Inhale through your nose as you swing the next leg forward. Step, land, lock the back leg, and forcefully exhale. Find a sustainable “step-breathe” cadence.
- Monitor Your Heart Rate: Use a heart rate monitor to stay in your aerobic “Zone 2” (typically 60-70% of max HR). If your heart rate spikes, you are going too fast. This is non-negotiable metabolic pacing.
- Perform the “Talk Test”: Your pace is correct if you can speak a full sentence to your trekking partner without gasping for air. If you can’t, slow down immediately. This is the simplest and most effective field test for proper pacing.
.
Mastering this combination of techniques is a game-changer. It allows you to transform a brutal uphill slog into a manageable, all-day effort, arriving at camp with energy to spare for acclimatization and recovery, rather than collapsing in exhaustion.
Calorie Deficit: How Much Weight Will You Lose on a 14-Day Trek?
One of the less-discussed realities of high-altitude trekking is significant, and often unavoidable, weight loss. This isn’t just due to the calories burned during long days of hiking. The very act of being at high altitude puts your body into metabolic overdrive. To stay warm and deliver oxygen to your tissues, your Basal Metabolic Rate (BMR)—the energy you burn at rest—increases substantially. In fact, physiological research indicates that your BMR can increase by 20-30% at high altitude. Combine this with a daily trekking energy expenditure of 3,000-5,000 calories and the common appetite suppression that occurs above 3,000 meters, and you have a recipe for a major calorie deficit.
On a typical 14-day high-altitude trek, it is not uncommon for a trekker to lose 5-10% of their body weight, primarily from fat and, unfortunately, muscle mass if protein intake is insufficient. This is not a healthy weight-loss plan; it’s a symptom of extreme physiological stress. A significant calorie deficit can impair immune function, slow recovery, and reduce your ability to stay warm, all of which can increase your risk of AMS and other illnesses. Your goal should be to mitigate this deficit as much as possible through a strategic nutrition plan.
The key is to “front-load” your calories and prioritize nutrient-dense foods. Your strategy should include:
- Carbohydrate Focus: Carbohydrates are the body’s most efficient fuel source at altitude, requiring less oxygen to metabolize than fats or proteins. Aim for 60-70% of your total calories from carbs.
- Eat When You Can: Appetite is often strongest in the morning and at lower altitudes. Eat a large, carbohydrate-rich breakfast and a substantial lunch. Dinner may be a smaller affair if you feel nauseous.
- Continuous Snacking: Don’t rely on three square meals. Snack continuously throughout the day on high-energy foods like nuts, dried fruit, and energy bars to maintain a steady supply of fuel.
- Prioritize Protein: To prevent muscle wasting, ensure you are consuming adequate protein (approx. 1.2-1.5g per kg of body weight) spread throughout the day.
Think of eating not as a pleasure, but as a critical mission task, just as important as putting one foot in front of the other.
Legs or Lungs: What Should You Prioritize for Elevation Gain?
This question gets to the heart of pre-expedition training. While we’ve established that raw fitness doesn’t prevent AMS, a well-conditioned body is an immense asset. A strong trekker is a more efficient trekker. As Black Sheep Adventures aptly puts it, “While physical fitness alone won’t prevent AMS, being in strong cardiovascular and muscular condition allows your body to function more efficiently on less oxygen and recover faster from exertion.” The answer, then, is not legs *or* lungs, but both, trained with the specific demands of high-altitude trekking in mind.
Training your lungs (Cardiovascular System) is about improving your body’s ability to process oxygen efficiently. This is your aerobic base. Long, slow endurance activities are key. This means hours of hiking, trail running, cycling, or swimming, performed consistently for 8-12 weeks before your trip. This builds a robust engine that can perform under stress. It also includes practicing specific breathing techniques, like the pursed-lip and diaphragmatic breathing you’ll use on the mountain, to improve respiratory efficiency.
Training your legs (Musculoskeletal System) is about building the specific strength and stability needed to carry a pack over uneven terrain for days on end without injury. This goes beyond simple cardio. It requires strength training focused on the legs (squats, lunges), the core (planks, rotational work), and the posterior chain (glutes, hamstrings). Most importantly, it requires specificity: the best way to train for hiking with a pack is to hike with a progressively heavier pack, preferably on hills or stairs to simulate elevation gain.
Your Action Plan: The 12-Week Pre-Trek Training Protocol
- Build Aerobic Base: Engage in 4-5 sessions per week of long, slow endurance work (hiking, running, cycling). Focus on time, not intensity.
- Simulate Elevation: At least twice a week, train on hills, stairs, or an incline treadmill. This is non-negotiable. Your body must adapt to sustained uphill effort.
- Develop Core Strength: Incorporate 2-3 sessions per week of dedicated leg and core strength training. Focus on compound movements like squats, lunges, and planks.
- Practice with Weight: Start hiking with a lightly loaded pack (5kg) and gradually increase the weight every two weeks until you are comfortable carrying your expected trek weight (10-15kg).
- Prioritize Recovery: Integrate rest days and active recovery (stretching, foam rolling) into your plan. Overtraining is a greater risk than undertraining. Your goal is to arrive at the trailhead strong and rested, not exhausted.
Key Takeaways
- AMS prevention is a science of managing ascent rate and physiology; it is not a test of physical fitness.
- HACE (brain) and HAPE (lungs) are fatal. Memorizing their distinct symptoms (ataxia vs. breathlessness at rest) is a non-negotiable survival skill.
- The golden rule of pacing is inviolable: above 3,000m, do not increase your sleeping altitude by more than 500m per day, and plan a rest day for every 1,000m of elevation gained.
Trekking High Circuits: How to Pace Your Daily Ascent to Avoid Burnout?
You can have the best gear, the strongest legs, and a perfect hydration strategy, but if you get your pacing wrong, you will get sick. Pacing your daily ascent is the single most important factor in successful acclimatization. The “golden rule” of high-altitude trekking is simple and absolute: above 3,000 meters (10,000 feet), medical guidelines specify that increases in sleeping altitude should not exceed 500m per day. This is not a suggestion; it’s a physiological speed limit. Furthermore, you should plan an additional rest day for every 1,000 meters of elevation gained.
Even with this conservative schedule, risk remains. Data from high-traffic routes reveals that even on standard acclimatization schedules, altitude illness prevalence can approach 30% at higher elevations like those on the Everest Base Camp trek. This highlights the importance of active acclimatization. This involves the principle of “Climb High, Sleep Low.” On your “rest” or acclimatization days, you don’t just sit around camp. You should take a short, slow hike 200-300 meters higher than your camp, spend an hour or so enjoying the view, and then descend back to the lower altitude to sleep. This process exposes your body to a higher altitude stressor for a short period, stimulating the adaptation process more effectively, while allowing you to recover in the relatively oxygen-rich environment of the lower camp.
Your daily rhythm should be “pole, pole”—Swahili for “slowly, slowly.” Use the Rest Step and Pressure Breathing techniques to maintain a pace where you can hold a conversation. Monitor yourself and your teammates constantly. Use a pulse oximeter in the mornings to check resting heart rate and oxygen saturation (SpO2). Stable or improving numbers are a sign of good adaptation. A significant drop in SpO2 or a rising resting heart rate is a warning sign to take an easier day, regardless of what the itinerary says. You must have the discipline to stick to your ascent profile, even when you feel strong. “Summit fever” is real, but a successful trekker views acclimatization days as a critical investment, not a delay.
By internalizing these medical principles and strategic protocols, you transform your high-altitude trek from a gamble against the mountain into a calculated, respectful partnership with it. The ultimate goal is not just to reach the summit, but to return safely with your health intact. The next logical step is to translate this knowledge into a concrete plan by working with a guide or tour operator who understands and implements these conservative safety standards.